
Salesforce Integration User
Integration Guide for Salesforce Integration User with Clazar
Prerequisites
Before connecting the Salesforce Integration User with Clazar, ensure you have the following:
- Clazar Salesforce Widget: The Clazar Widget must be installed within your Salesforce Environment. This widget includes the Clazar Authentication App, which is essential for setting up the connection.
- Salesforce Integration User: A dedicated Salesforce Integration User with a valid Salesforce Integration license is required. This user will be configured to interact with Clazar.
Configuration Steps
Steps to configure and enable the Salesforce Integration User for integration with Clazar.
Step 1: Assign Client Credential Run As - Integration User
To assign the necessary credentials to your Salesforce Integration User, proceed as follows:
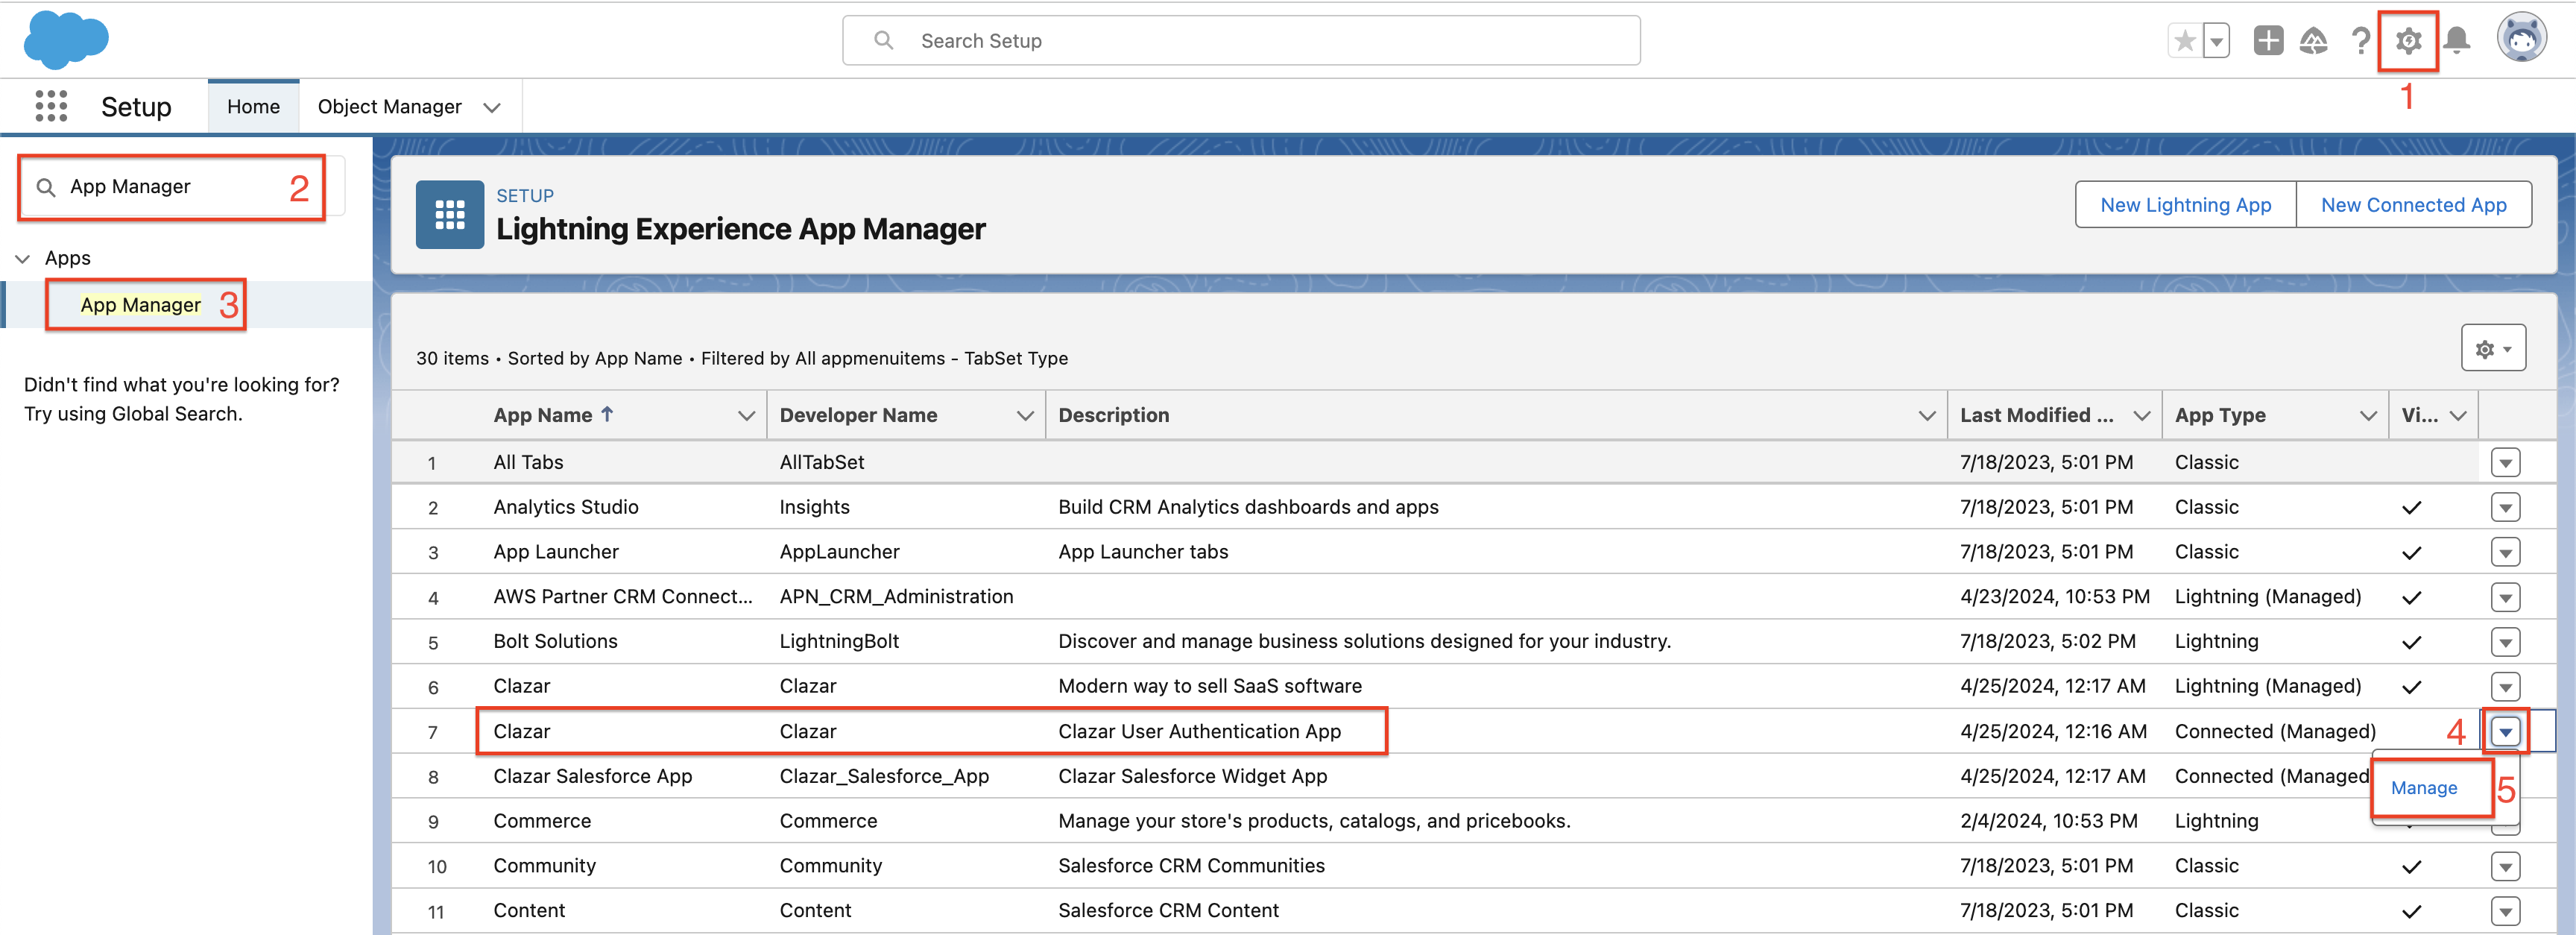
- Go to Setup
- Search App Manager
- On the Clazar App, Click on ▼ and Manage
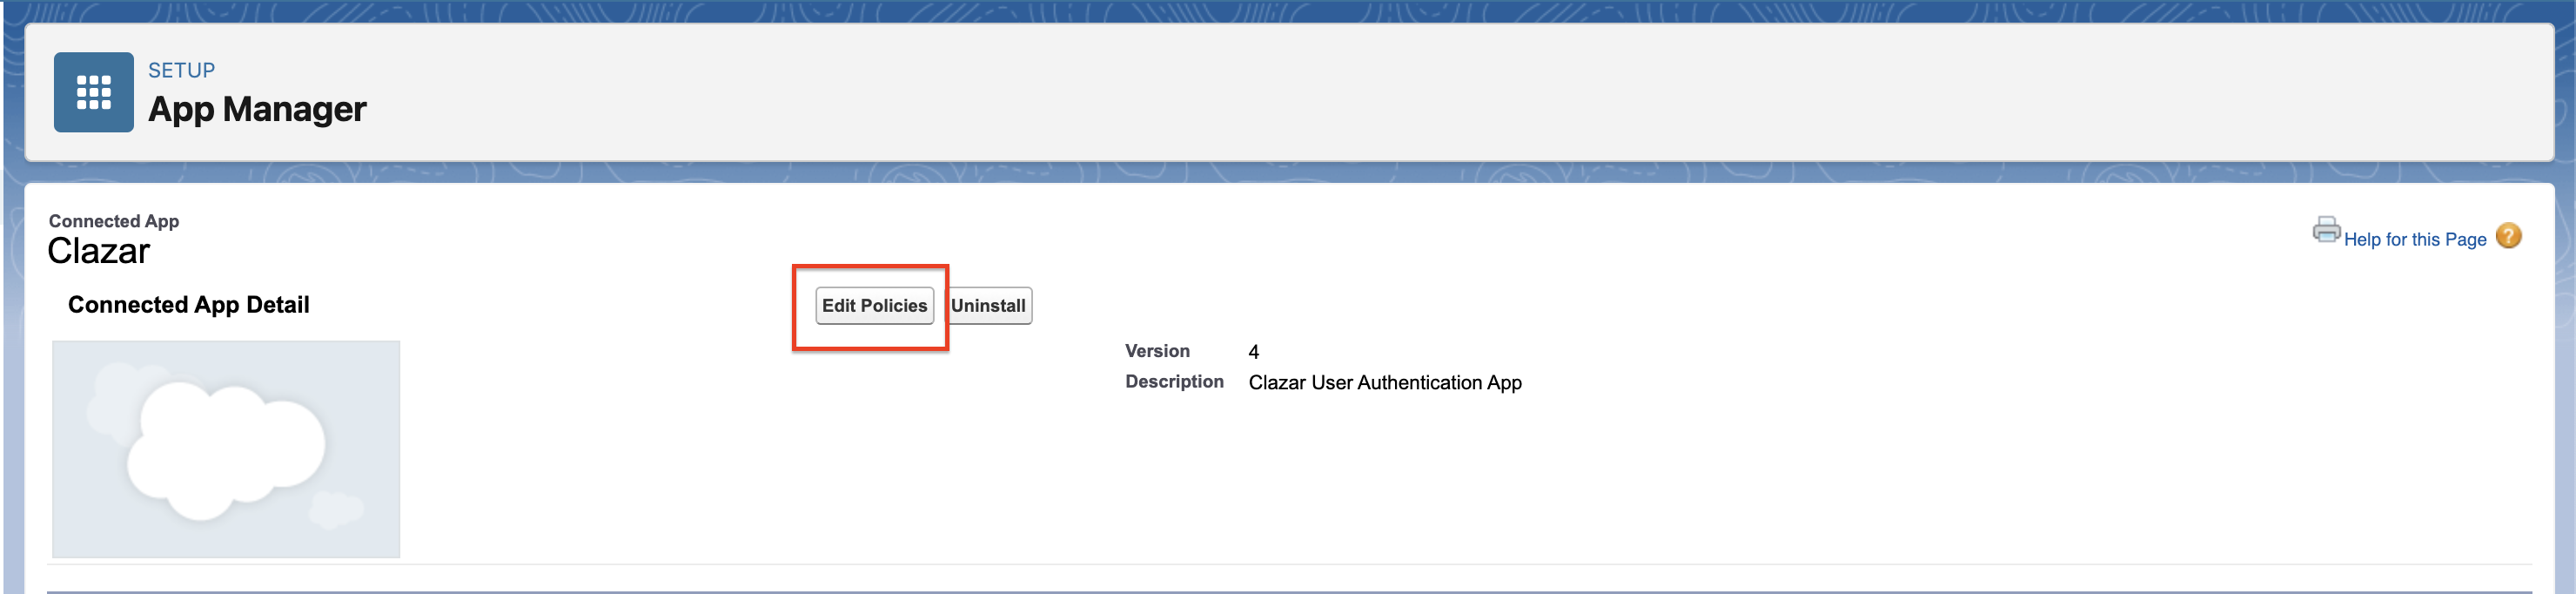
Step 2: Edit the App Policies
Modifies the application policies to ensure the Integration User has been assigned to the Client Credentials Flow.
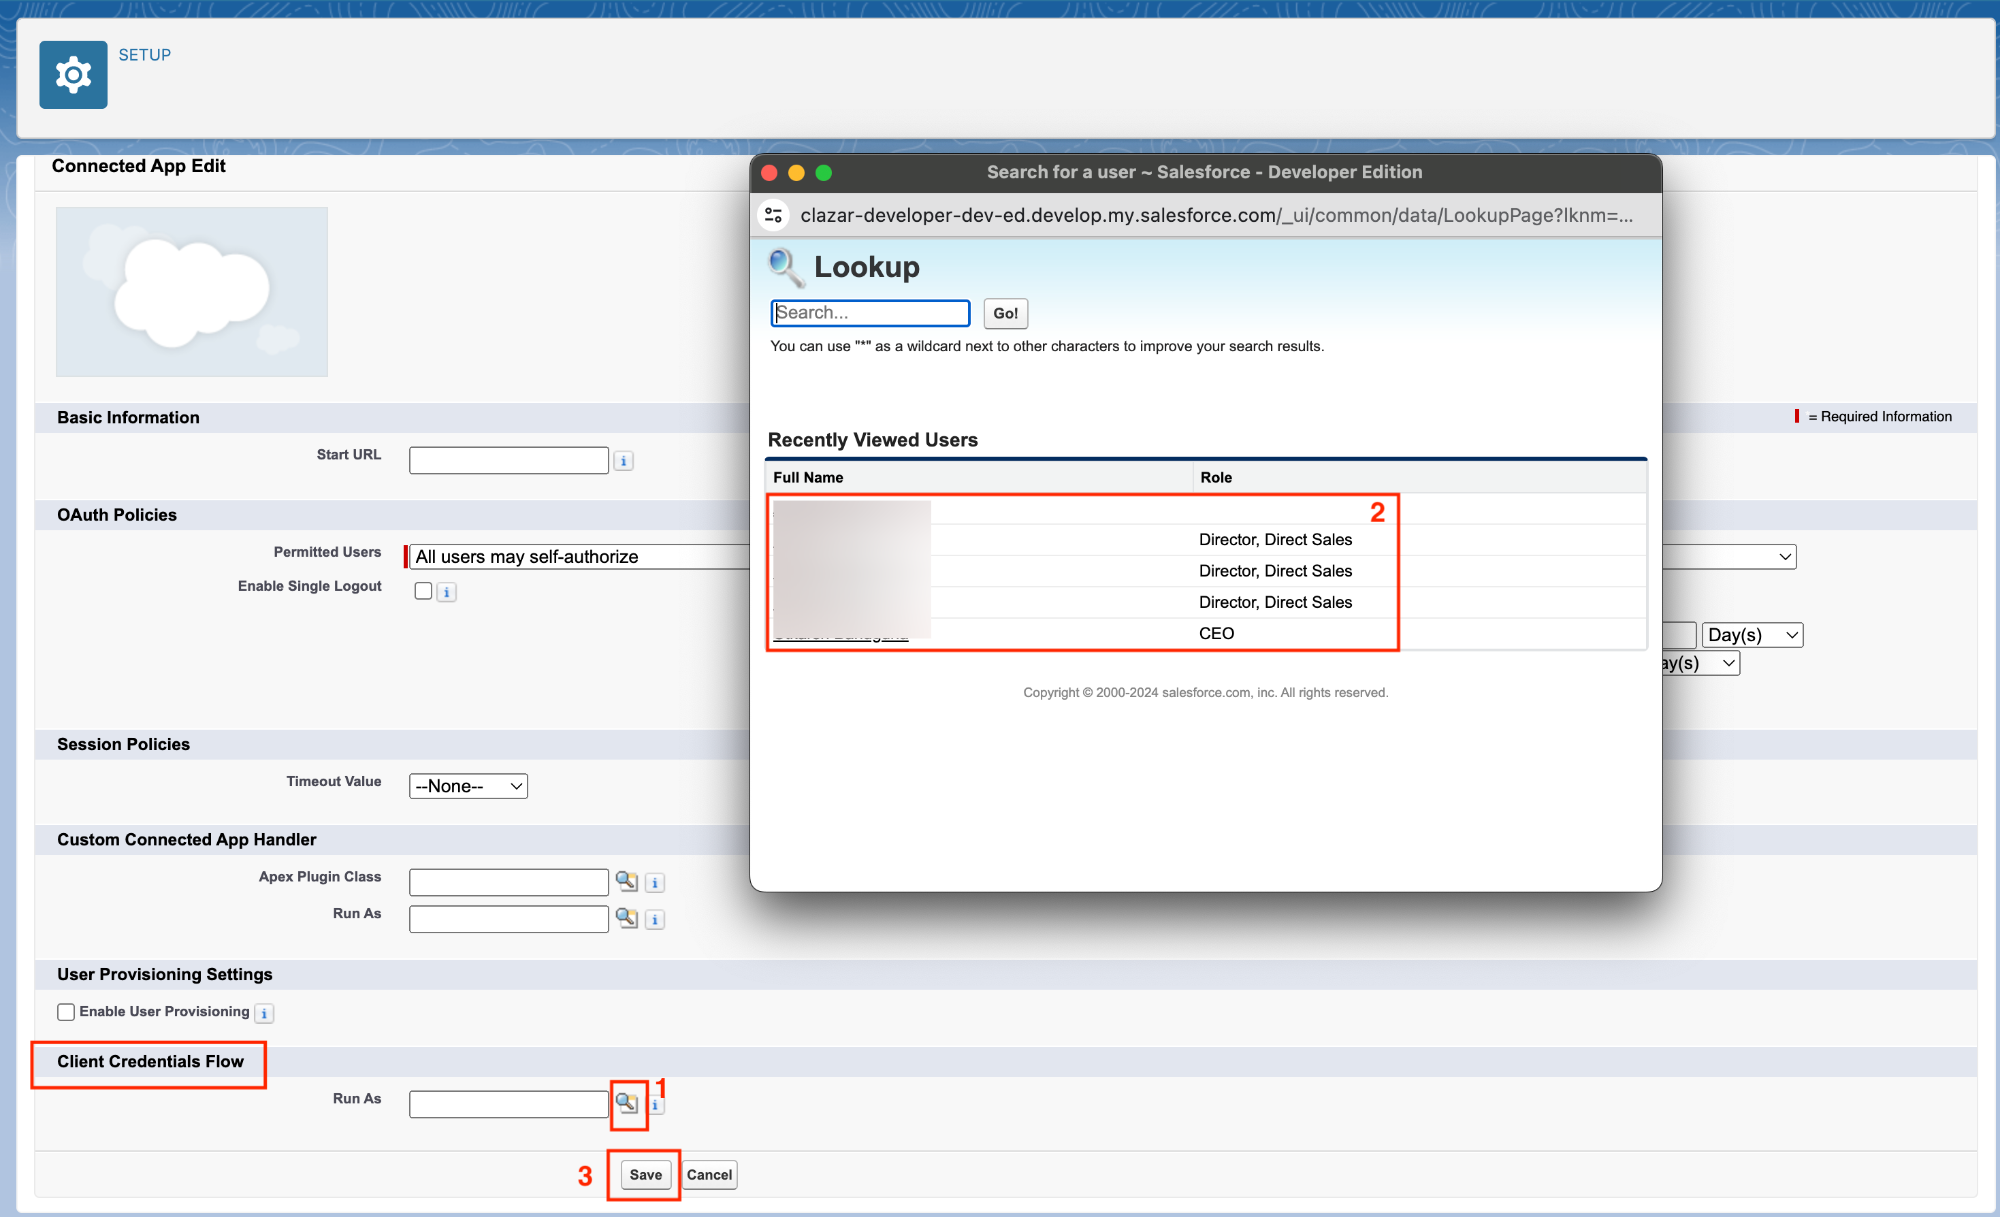
Step 3: Assign the Integration User
- On the Client Credentials Flow Section
- Click on the 🔍 search icon
- Select the Integration User from the list to associate as a Run As user.
Step 4: Grant Clazar Salesforce Permission Set
Grant the required permissions to the Integration User by assigning the Clazar Salesforce Permission Set.
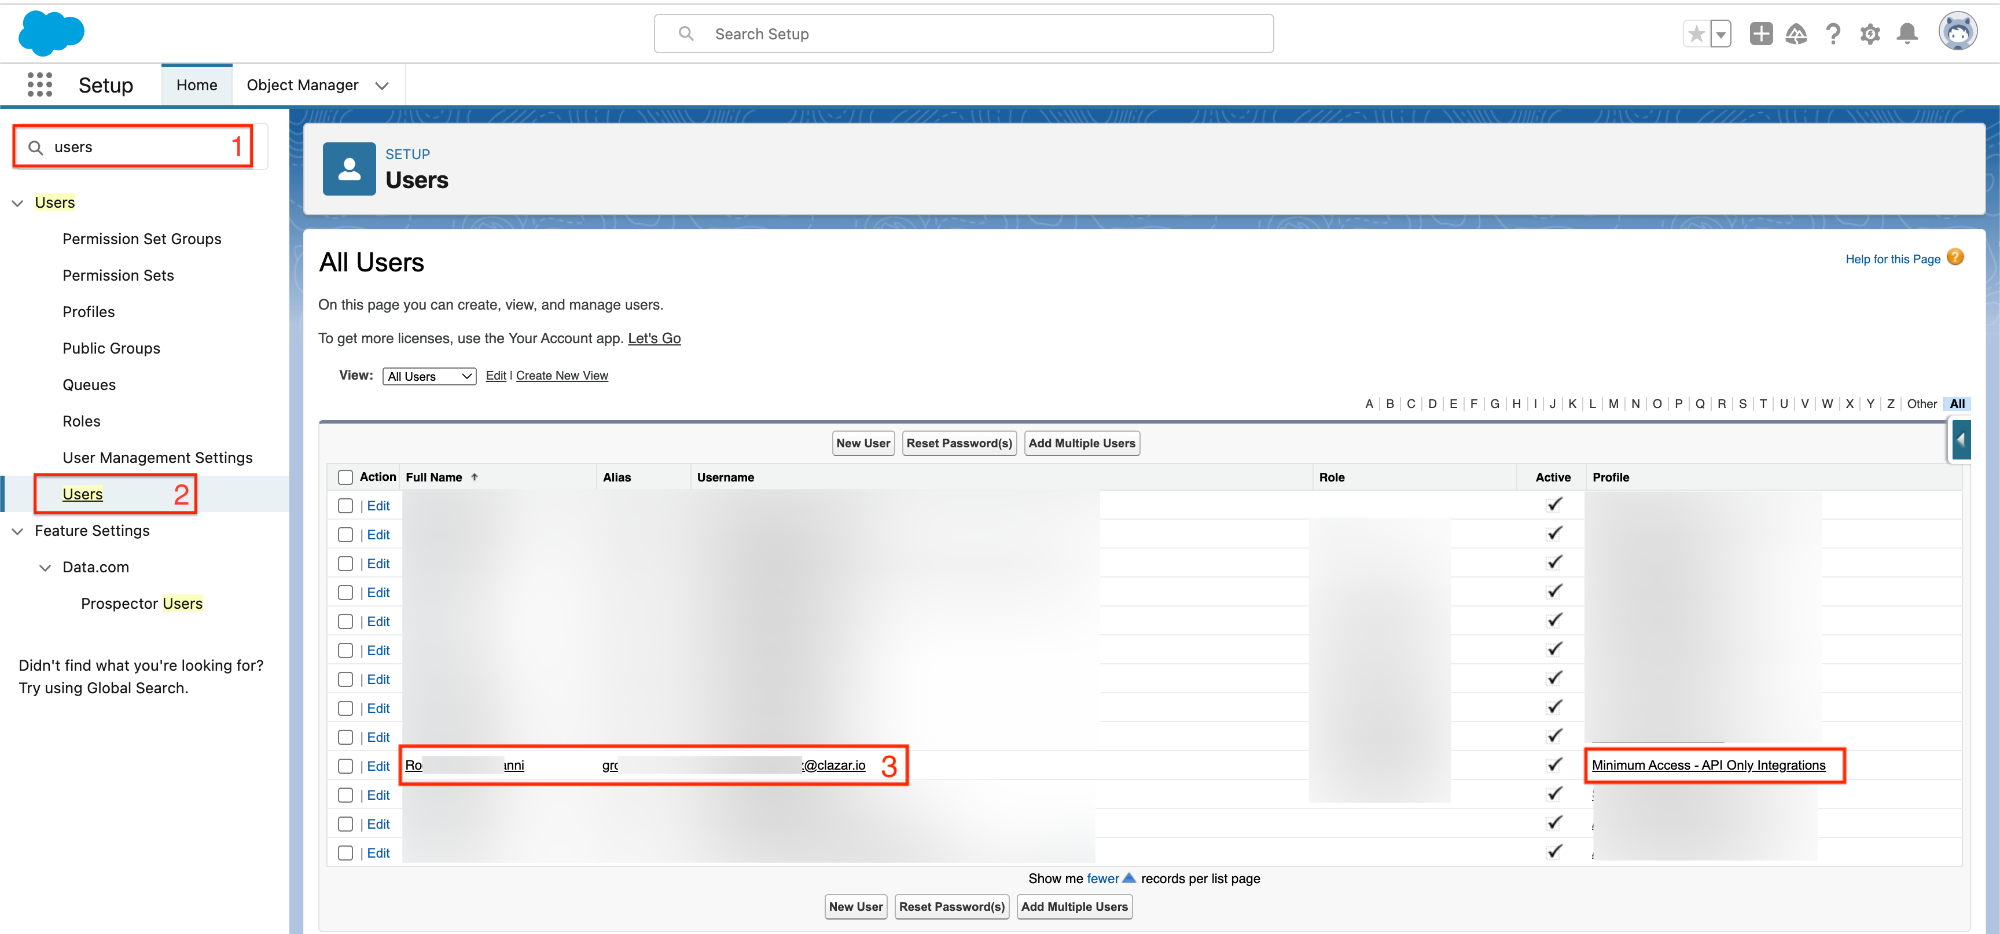
- Search Users on Quick Search
- Click on the user's name.
- Click on Permission Set Assignment
- Click on Edit Assignment
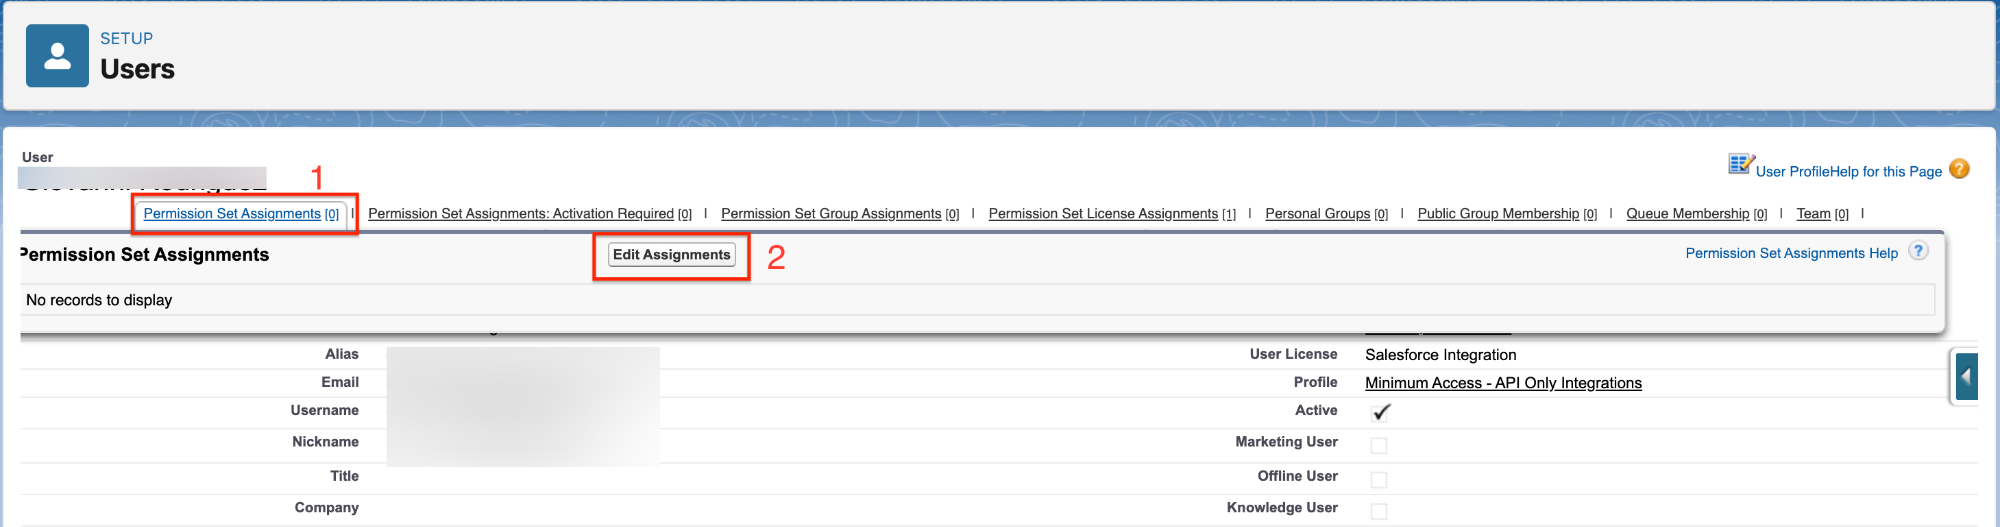
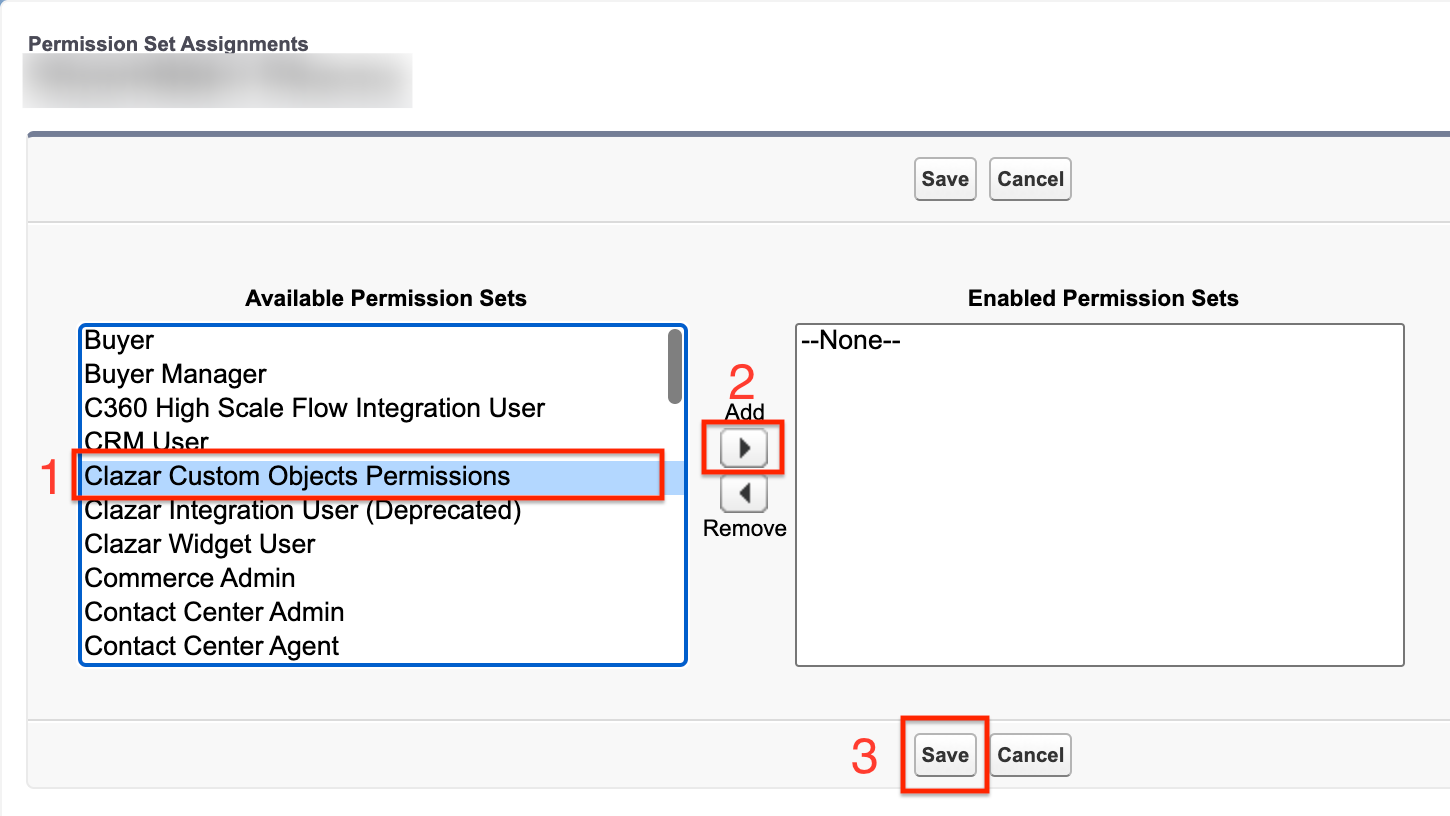
- Select Clazar Salesforce Integration User
- Click on ▶ Add to add the Permission Set
- Click Save
Step 5: Assign Salesforce Integration User License
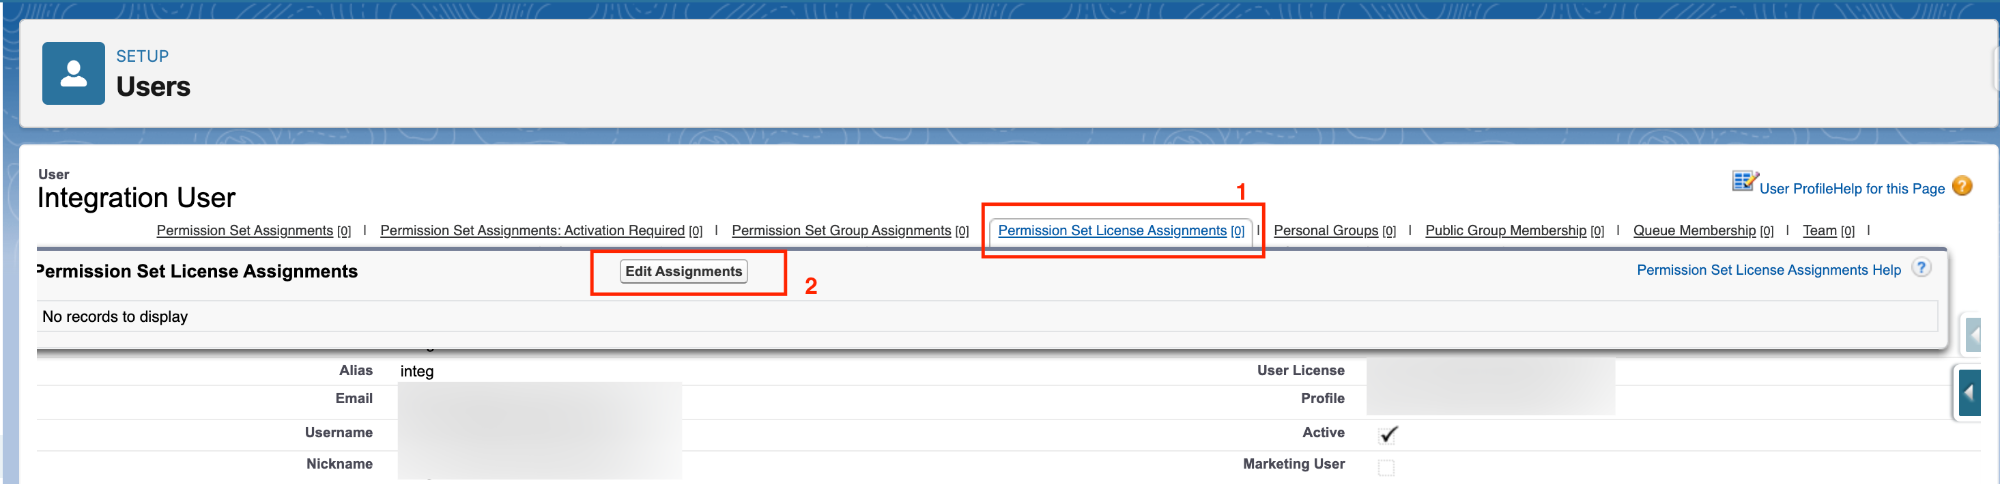
- Search Users on Quick Search
- Click on the user's name.
- Click on Permission Set License Assignment
- Click on Edit Assignment
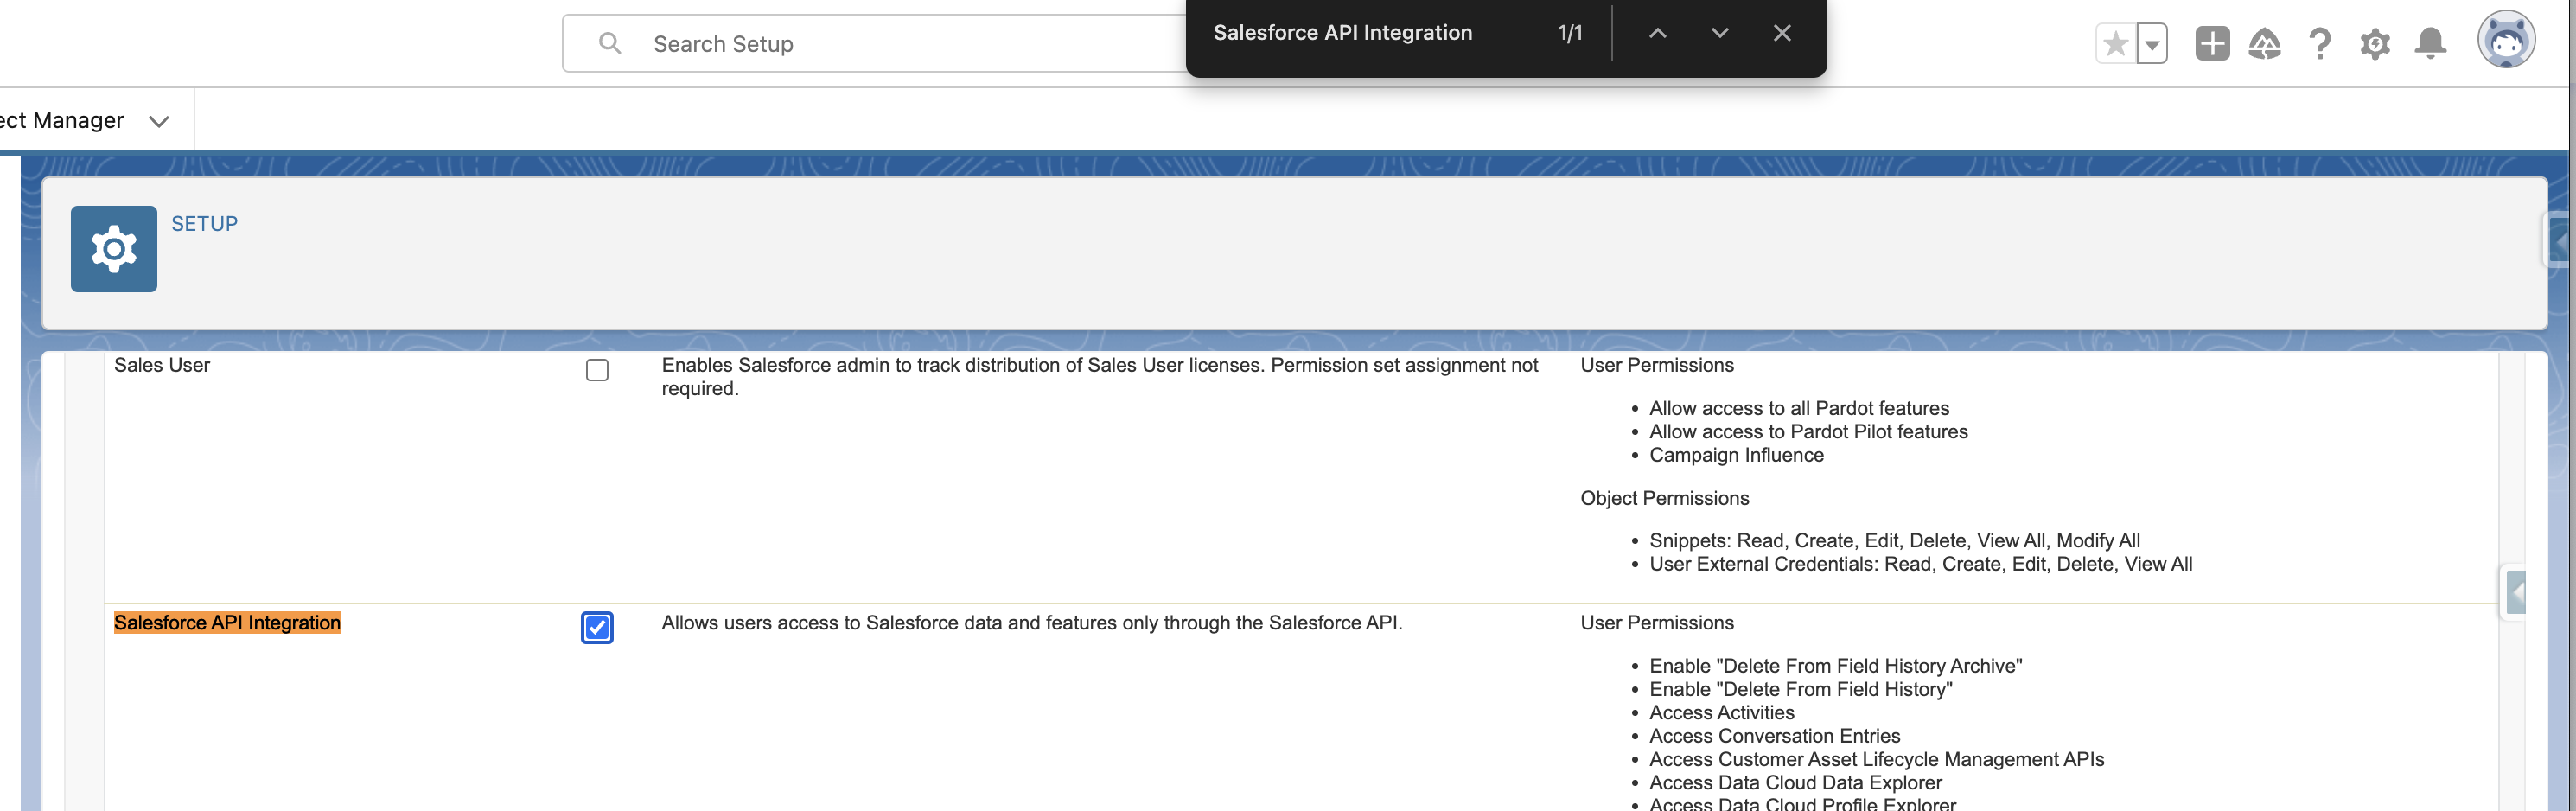
- Search Salesforce API Integration
- Select the Checkbox
- Save
Step 6: Setting Standard Object Permissions
Ensure the Salesforce Integration User has appropriate permissions for accessing standard Salesforce Objects such as Accounts, Contacts, Opportunities, Quotes and CPQ Quotes.
Permissions Table Example:
| Object | Read | Read All | Create | Edit | Delete |
|---|---|---|---|---|---|
| Accounts | ✅ | ✅ | ✅ | ||
| Contacts | ✅ | ✅ | ✅ | ✅ | |
| Opportunities | ✅ | ✅ | ✅ | ✅ | |
| Lead | ✅ | ✅ | |||
| Quote | ✅ | ✅ | ✅ | ✅ | |
| CPQ Quote | ✅ | ✅ | ✅ | ✅ |
Below are the steps to either create a new permission set or adjust an existing profile.
Option 1: Creating and Assigning a New Permission Set
Creating a new permission set allows you to grant specific permissions without altering existing profiles, providing flexibility and control over user capabilities.
1.1 Create a New Permission Set
- Step 1: Navigate to Setup.
- Step 2: In the Quick Find box, enter "Permission Sets" and select it.
- Step 3: Click New Permission Set.
- Step 4: Name the permission set (e.g., "Integration User Permissions") and assign it to the appropriate user license.
- Step 5: Click Save.
1.2 Assign Object Permissions
- Step 1: Within the permission set, select Object Settings.
- Step 2: Choose the object (e.g., Opportunity, Account).
- Step 3: Set the desired permissions (e.g., Read, Create, Edit, Delete) and field-level security as required.
- Step 4: Click Save.
- Repeat these steps for each required object.
1.3 Assign the Permission Set to the Integration User
- Step 1: Navigate to the Integration User’s record.
- Step 2: In the Permission Set Assignments section, click Edit Assignments.
- Step 3: Add the newly created permission set to the selected permission sets.
- Step 4: Click Save.
Option 2: Modifying an Existing Profile
Modifying an existing profile might be more efficient if many users require the same permissions.
2.1 Select a Profile to Modify
- Step 1: Navigate to Setup.
- Step 2: In the Quick Find box, type "Profiles" and select it.
- Step 3: Choose the profile you wish to modify (e.g., “Custom: Integration Profile”).
2.2 Edit Object Permissions
- Step 1: Within the profile, find Object Settings.
- Step 2: Select the object and modify the permissions as necessary.
- Step 3: Adjust field-level security settings if needed.
- Step 4: Click Save.
Best Practices and Recommendations
- Granular Control: Utilize permission sets for precise user and group permissions management.
- Profile Changes Impact: Profile changes affect all assigned users; suitable for broad updates.
- Regular Audits: Continuously review permissions for compliance and relevance.
Updated 29 days ago