
Self-Hosted Registration
This guide explains how to configure a self-hosted registration endpoint for integrating with Clazar. By setting up a self-hosted registration, you can handle buyer registration directly on your platform when a user subscribes through cloud marketplaces like AWS, Azure, or GCP.
Overview
When a buyer subscribes to your listing on a cloud marketplace, Clazar will send a POST request to your specified endpoint with cloud-specific information in the payload. To ensure the integrity of the data, a signature-based approach is used for verification. Your endpoint will need to validate the signature and ensure the data has not been tampered with. Once processed, your endpoint should respond with a 302 redirect response containing the URL where the buyer should be redirected to complete their registration.
High Level Architecture
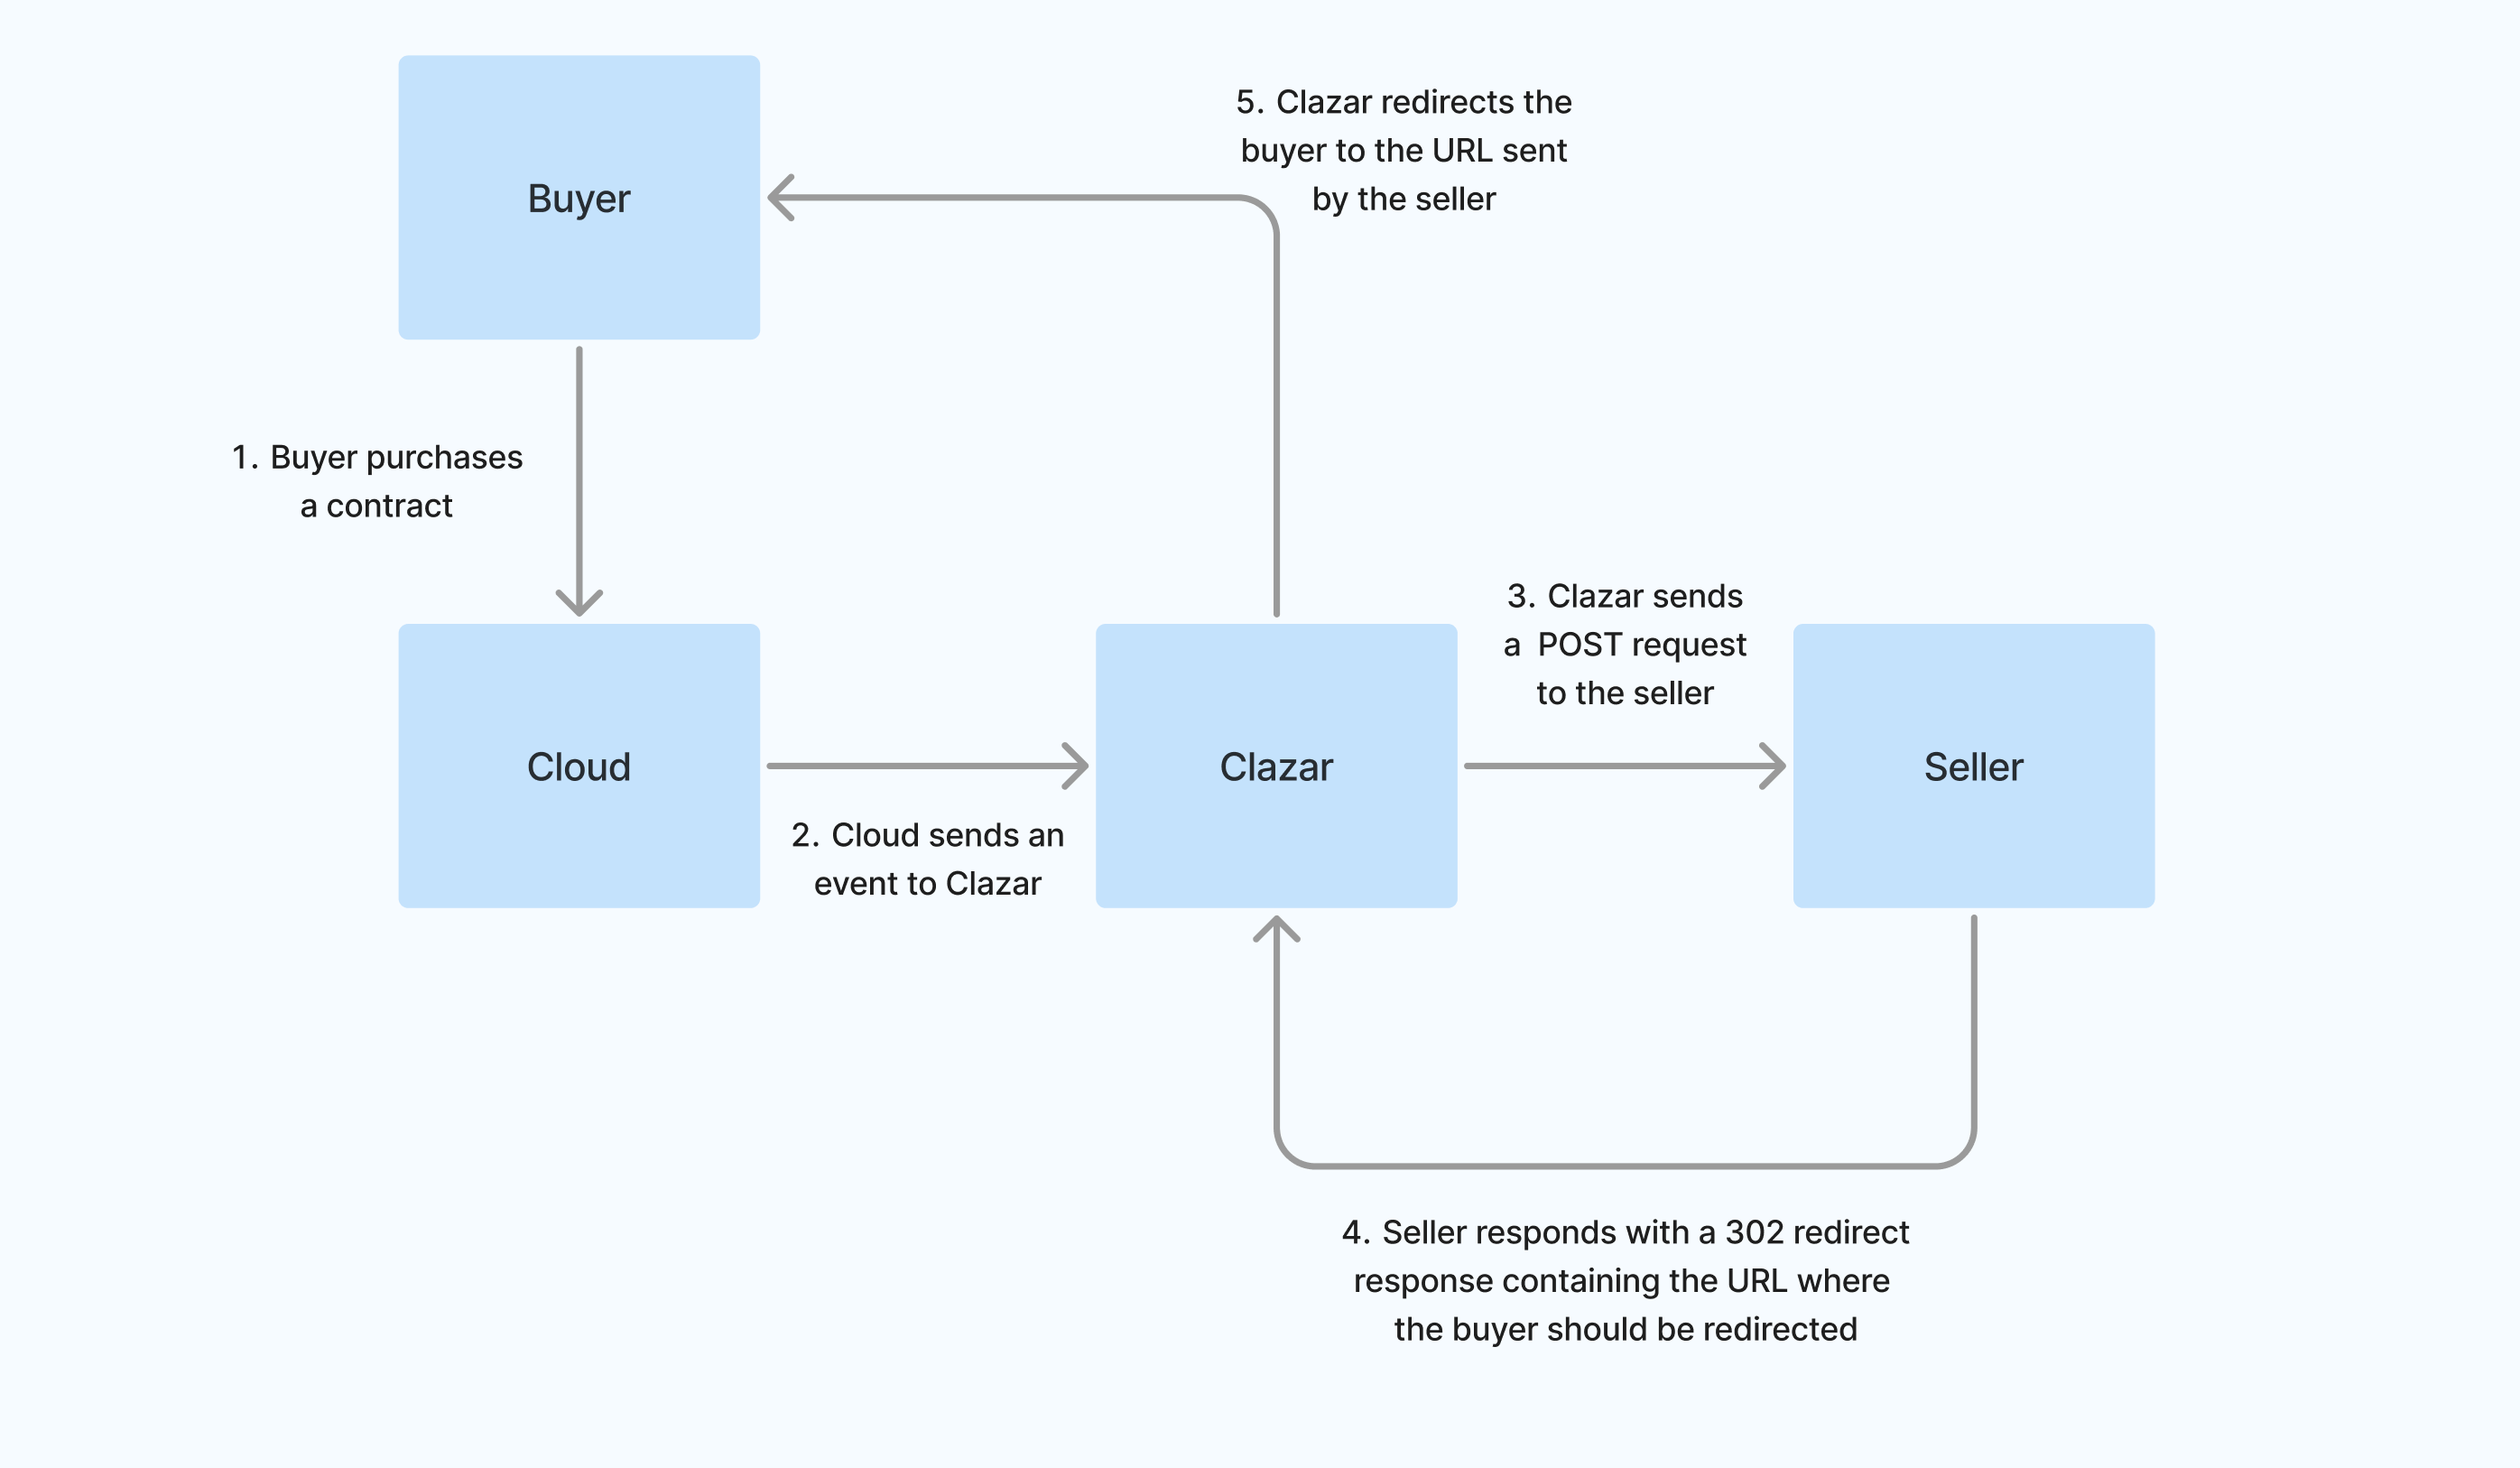
Data Flow Diagram of Self Hosted Registration Flow
Step-by-Step Instructions
Step 1: Create an Endpoint to Receive POST Requests
- Set up an HTTP POST endpoint on your server to receive requests from Clazar.
- Ensure that the endpoint is publicly accessible.
- The created endpoint needs to be configured in the Clazar app.
Step 2: Verify the Signature to Check Data Integrity
- When Clazar sends the POST request, it will contain the following in the headers:
{
  "X-Clazar-Signature": "<signature>",
  "X-Clazar-Timestamp": "<current_timestamp>"
}- The request body will contain the payload with the cloud-specific information.
To verify the integrity of the data, follow these steps:
-
Construct the message
- The content to sign is composed by concatenating
timestampandpayload
message = f"{timestamp}.{payload}"Where payload is the raw body of the request
Note:
When constructing the message, the raw payload should be key-sorted.
- The content to sign is composed by concatenating
-
Generate the expected signature
- Clazar uses an HMAC with SHA-256 to sign the message.
- To calculate the expected signature, use the signing secret provided by Clazar to create a HMAC (hash-based message authentication code) and generate the signature. Below is the example for different programming languages:
import hmac
import hashlib
import base64

def generate_signature(secret_key, message):
    secret_key_bytes = secret_key.encode('utf-8')
    message_bytes = message.encode('utf-8')
    hmac_signature = hmac.new(secret_key_bytes, message_bytes, hashlib.sha256).digest()
    return base64.b64encode(hmac_signature).decode('utf-8')

# Example usage
secret_key = "your_secret_key"
message = f"{current_timestamp}.{json.dumps(request_data, sort_keys=True, separators=(',', ':'))}"
signature = generate_signature(secret_key, message)
print("Signature:", signature)
const crypto = require('crypto'); function generateSignature(secretKey, message) { return crypto.createHmac('sha256', secretKey) .update(message) .digest('base64'); } function sortObjectKeys(obj: any): any { if (typeof obj !== 'object' || obj === null) { return obj; } if (Array.isArray(obj)) { return obj.map(sortObjectKeys); } return Object.keys(obj).sort().reduce((result: any, key) => { result[key] = sortObjectKeys(obj[key]); return result; }, {}); } // Example usage const secretKey = "your_secret_key"; const sortedBody = sortObjectKeys(req.body); const payload = JSON.stringify(sortedBody); const message = `${timestamp}.${payload}`; const signature = generateSignature(secretKey, message); console.log("Signature:", signature);import javax.crypto.Mac; import javax.crypto.spec.SecretKeySpec; import java.util.Base64; public class HMACSignature { public static String generateSignature(String secretKey, String message) throws Exception { Mac sha256_HMAC = Mac.getInstance("HmacSHA256"); SecretKeySpec secret_key = new SecretKeySpec(secretKey.getBytes(), "HmacSHA256"); sha256_HMAC.init(secret_key); byte[] hmacBytes = sha256_HMAC.doFinal(message.getBytes()); return Base64.getEncoder().encodeToString(hmacBytes); } public static void main(String[] args) { try { String secretKey = "your_secret_key"; String message = "timestamp.payload"; String signature = generateSignature(secretKey, message); System.out.println("Signature: " + signature); } catch (Exception e) { e.printStackTrace(); } } } -
Compare Signatures
- Match the generated signature with the
X-Clazar-Signatureheader from the request. If they do not match, reject the request as the data may have been tampered with.
- Match the generated signature with the
-
Handle Replay Attacks
- Check that the
X-Clazar-Timestampfalls within your allowed time tolerance to prevent replay attacks.
- Check that the
Step 3: Process the Cloud Information
- The payload will contain cloud-specific information that you can use, depending on which cloud platform the buyer is subscribing through.
- The below contains example payloads for each cloud.
{
  "cloud_details": {
    "ProductCode": "4abcd7cksf2sl82bytk12ffj7",
    "CustomerAWSAccountId": "123458492006",
    "CustomerIdentifier": "ABcdH7jsXqL"
  },
  "clazar_listing_id": "0abc6f67-9822-8b68-8f5c-145e7db863cb",
  "clazar_buyer_id": "a1b2c366-d5a1-49d3-ac55-6c537f481c58",
  "cloud": "aws"
}
{
"cloud_details": {
"subscriptionName": "Example Subscription",
"offerId": "example-offer-id",
"planId": "example_ab12csf1-s2d8-1245-ab53-1234424b99ac-vs",
"id": "123cef2f-5b28-4s5d-abcd-d3ag8821av13",
"subscription": {
"allowedCustomerOperations": ["Delete", "Read", "Update"],
"purchaser": {
"puid": "1234000A09FF123",
"tenantId": "abc123b0-be36-5f2a-7avx-ds6123a56532",
"emailId": "[email protected]",
"objectId": "abc123b0-be36-5f2a-7asf-ds6123a12345",
},
"created": "2024-01-01T21:09:11.6442825Z",
"isFreeTrial": false,
"saasSubscriptionStatus": "PendingFulfillmentStart",
"publisherId": "example1234578901234",
"beneficiary": {
"puid": "12345000F09DX123",
"tenantId": "abc123b0-be36-5f2a-7avx-ds6123a56532",
"emailId": "[email protected]",
"objectId": "abc123b0-be36-5f2a-7asf-ds6123a12345",
},
"isTest": false,
"name": "Company Name",
"offerId": "example-offer-id",
"autoRenew": false,
"planId": "example_ab12csf1-s2d8-1245-ab53-1234424b99ac-vs",
"term": {"termUnit": "P1M"},
"id": "123cef2f-2b28-4s5d-abcd-d3ag8821as13",
"lastModified": "0001-01-01T00:00:00",
"sandboxType": "None",
"sessionMode": "None"
}
},
"clazar_listing_id": "0abc6f67-9822-8b68-8f5c-145e7db863cb",
"clazar_contract_id": "a1b2c366-d5a1-49d3-ac55-6c537f481c58",
"cloud": "azure"
}{
"cloud_details": {
"google": {
"roles": ["account_admin"],
"user_identity": 123456789123454167534
},
"user_info": {
"name": "Example Name",
"id": "123456789123454167534",
"verified_email": true,
"given_name": "Example",
"family_name": "Name",
"email": "[email protected]",
"picture": "https://lh3.googleusercontent.com/a/example"
},
"sub": "678912345678912345678"
},
"clazar_listing_id": "0abc6f67-9822-8b68-8f5c-145e7db863cb",
"clazar_contract_id": "a1b2c366-d5a1-49d3-ac55-6c537f481c58",
"cloud": "gcp"
}Step 4: Send a 302 Redirection Response
After processing the information, your endpoint should send a 302 redirection response with the redirection URL included in the Location header.
Testing your Endpoint
Before going live, you can test your endpoint with simulated POST requests from the Clazar app:
- Test Mode Header:
- When testing, we will send a request with the header
{'X-Test-Mode': 'true'}to indicate that it is a test request.
- When testing, we will send a request with the header
- Verify the Following:
- The integrity of the data by validating the
X-Clazar-Signature. - The cloud information is processed according to your needs.
- Your endpoint returns a 302 redirection response with a valid URL in the Location header.
- The integrity of the data by validating the
Example Test Request:
{
  "cloud_details": {
    "ProductCode": "4abcd7cksf2sl82bytk12ffj7",
    "CustomerAWSAccountId": "123458492006",
    "CustomerIdentifier": "ABcdH7jsXqL"
  },
  "clazar_listing_id": "0abc6f67-9822-8b68-8f5c-145e7db863cb",
  "clazar_buyer_id": "a1b2c366-d5a1-49d3-ac55-6c537f481c58",
  "cloud": "aws"
}
Test Header:
{
  "X-Clazar-Signature": "<signature>",
  "X-Clazar-Timestamp": "<current_timestamp>",
  "X-Test-Mode": "true"
}
Summary
- Create an HTTP POST endpoint: Ensure it can handle our POST requests.
- Verify Data Integrity: Use the signature-based approach to validate the payload.
- Handle Cloud-Specific Information: Depending on the cloud, the data format may differ.
- Send a 302 Redirection Response: Include the redirection URL in the Location header.
With this setup, you will be able to manage your buyer registrations seamlessly, using your own self-hosted registration page.
Updated 9 days ago