
Webhooks
Receive notifications via HTTP requests each time an event occurs
Webhooks are the mechanism through which services send event notifications to each other. They are in essence a POST request made to a predefined endpoint.
Notifications through Clazar's webhooks allow your applications to respond to your marketplace-related events seamlessly. For example, you may want to automatically change the existing configuration for a buyer on your system when they modify or cancel their contract on the marketplace. Clazar's platform can notify you each time an event occurs through your configured webhooks.
You can manage all your webhook-related settings by going to Settings -> Integrations [Webhooks].
Event Catalog
The Event Catalog showcases all the event types available for subscription.
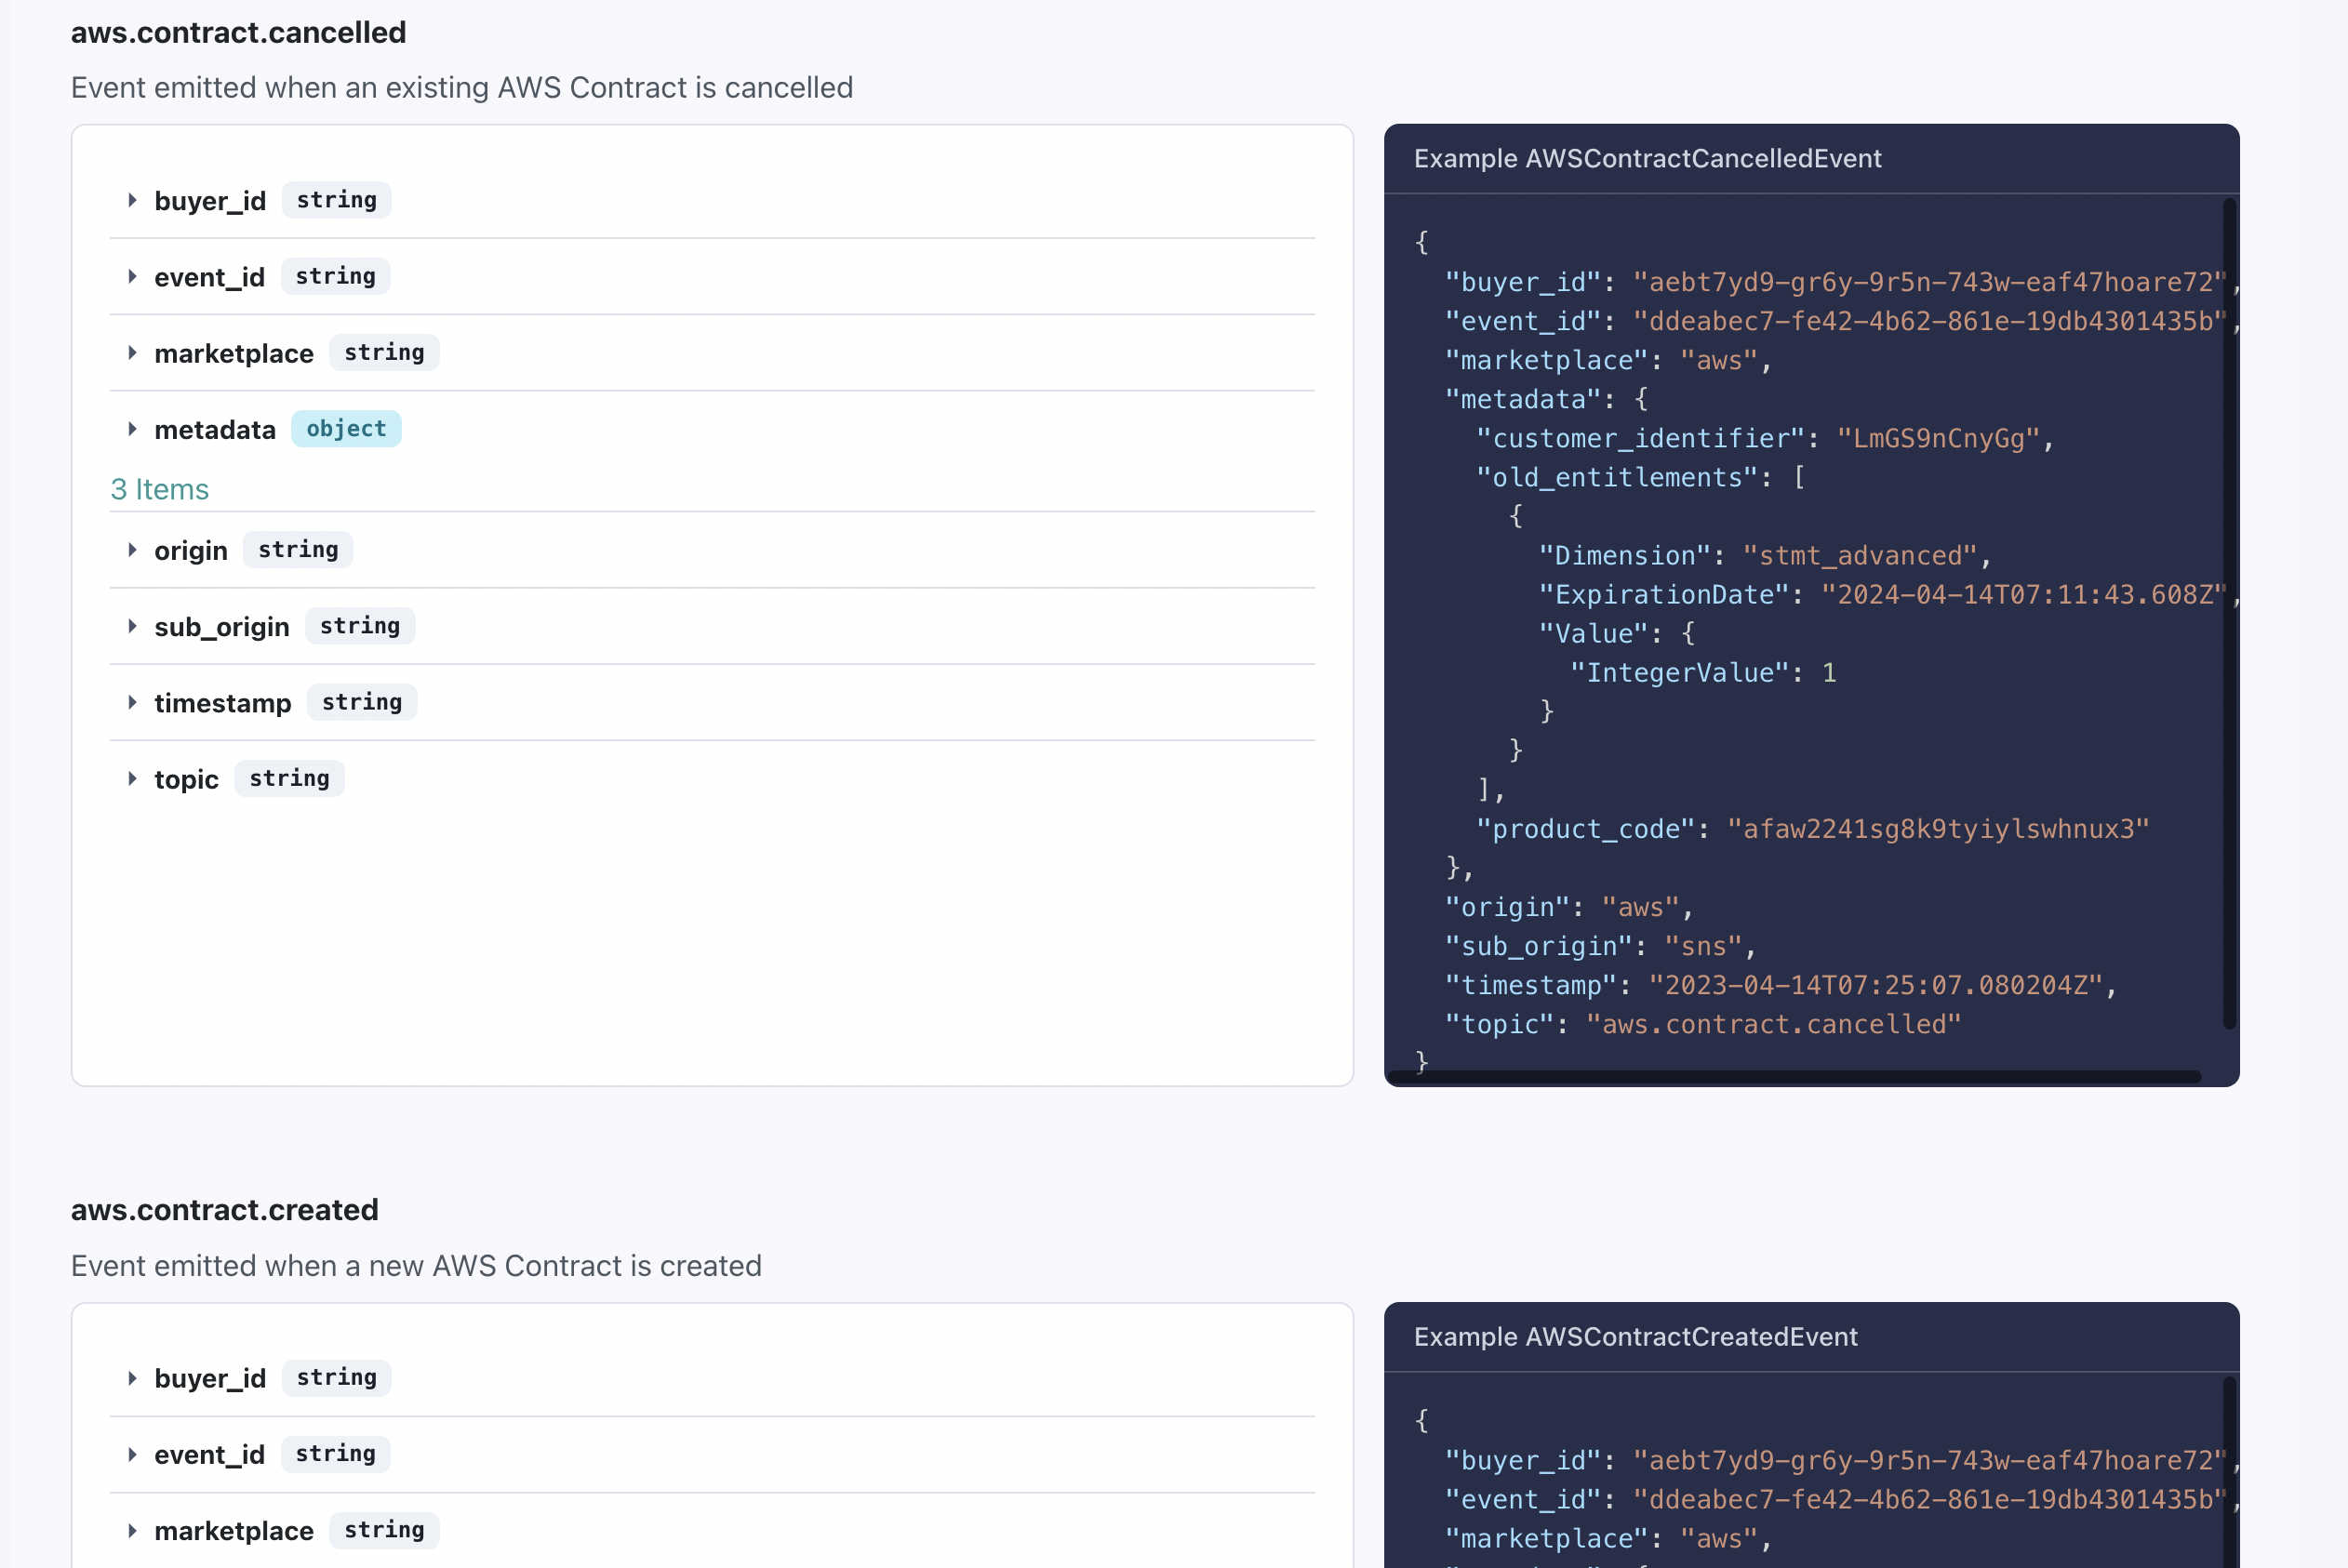
Clazar's Event Catalog
The catalog provides the event definition, including the payload structure and expected types, along with example payloads for each event type.
Adding Endpoints
To begin receiving event notifications from Clazar, you need to configure your endpoints. You can add an endpoint by specifying a URL and selecting the event types which should be delivered to it.
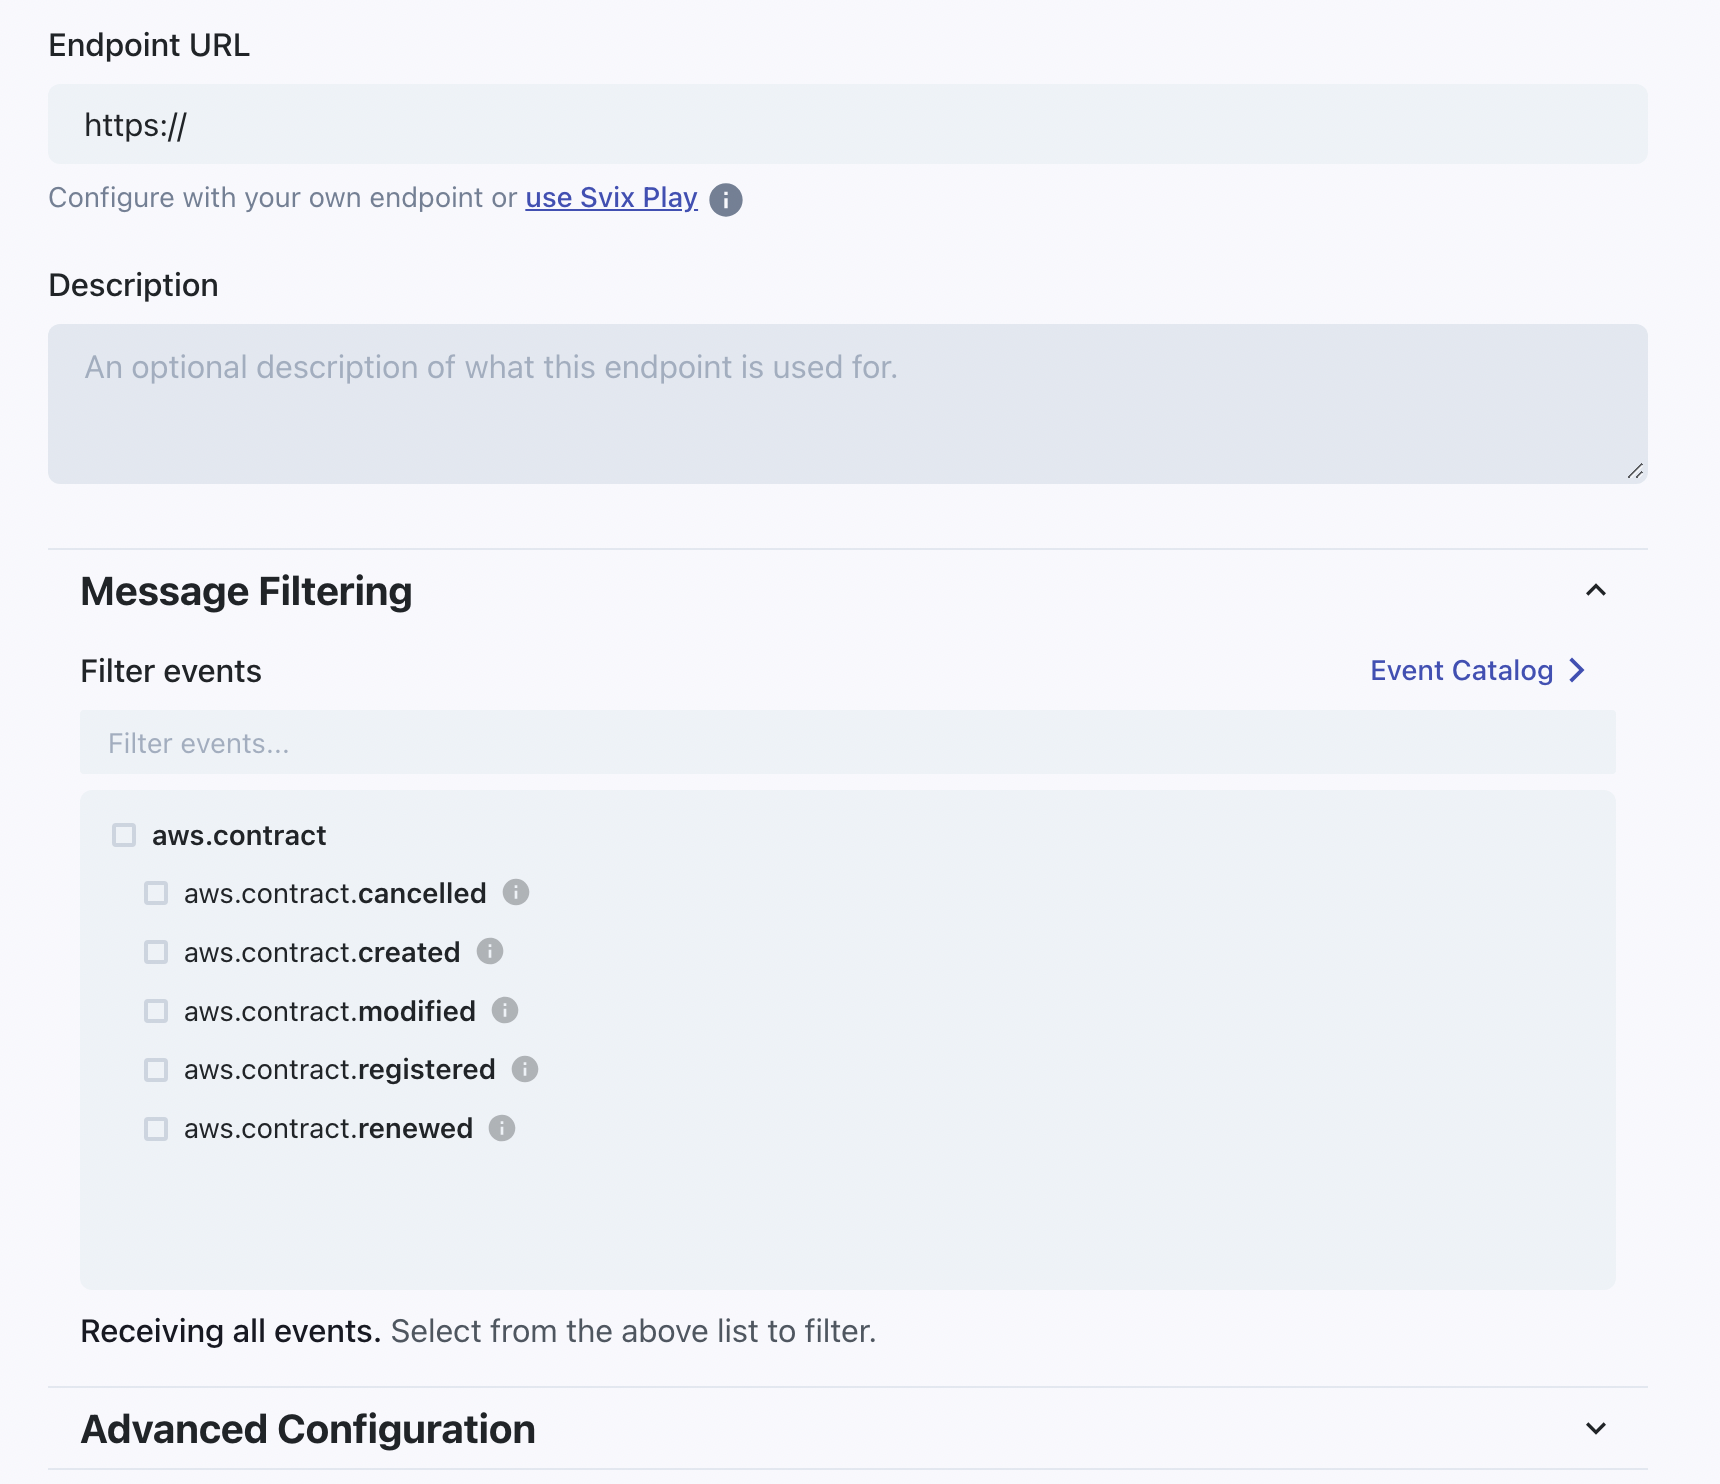
Adding a new webhook endpoint
Endpoint Event FilterWhen you are adding a new endpoint and have not selected any event types to filter on, even though the Message Filtering section may indicate "Receiving all events", you will not be able to proceed until you filter based on some event types. This is to ensure that you do not receive any unexpected messages if new event types are added in the future. You can listen to all the available event types by selecting all of them in the filter list.
Additionally, you can apply a rate limit to your endpoint from the Advanced Configuration section.
You can always change the complete configuration for an endpoint after adding it.
Editing an Existing Endpoint
Once you have added an endpoint, you can edit its complete configuration, including event types to filter on, rate limit, and even the endpoint URL itself.
Changing Endpoint URLAlthough you have the option to edit the URL for an existing endpoint, we strongly recommend against it, since doing so will make all your attempted messages logs reflect that change which will make them unusable and misleading at best. It is better to create an entirely new endpoint if you ever feel the need to change the URL for an existing one - it is quite easy.
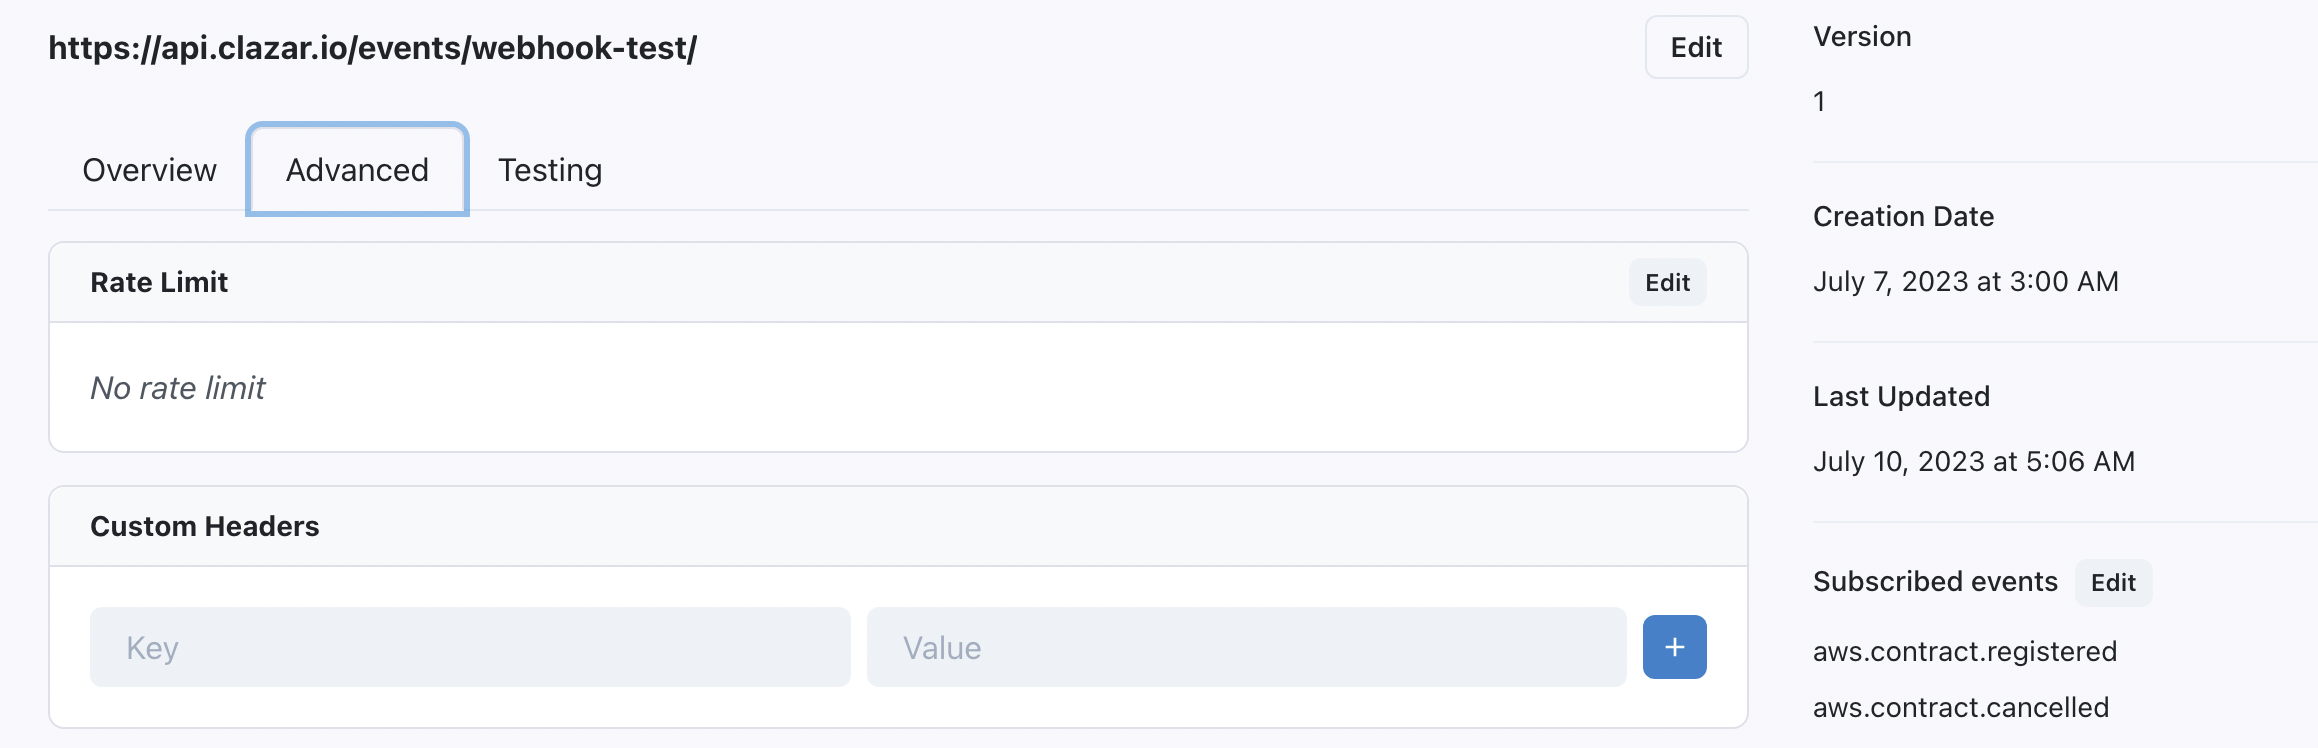
Editing an Existing Endpoint
More advanced configuration includes adding custom headers to your endpoints as key-value pairs which will be sent along with the the POST request headers.
Receiving and Acknowledging Messages
When a new event occurs, the event type for which your endpoint is subscribed to, a POST request will be made to your endpoint URL and you you should return a 2xx status code response within 15 seconds to acknowledge that the message has been processed. If a successful acknowledgement is not returned within the acknowledgement deadline, the message will be retried with the following intervals between successive retries:
- 5 seconds
- 5 minutes
- 30 minutes
- 2 hours
- 5 hours
- 10 hours
- 10 hours
Removing or disabling an endpoint will also disable any pending delivery attempts to it.
Each endpoint has an Attempted Messages section at the bottom which lists all the messages which were attempted to be sent to the endpoint, along with their success status.

Attempted Messages for an Endpoint
If an attempted message does not get successfully acknowledged even after all scheduled retries, the message is marked as Failed.
Manual Retries
You can retry failed messages manually if your endpoint configuration was incorrect or your application which listens on the endpoint URL was down.
You have the options to:
- Resend a particular message
- Resend all failed messages from a time window, e.g., since 8 hours ago, since yesterday, etc.
- Resend all failed messages since the time of a particular message attempt.
- Replay missing messages from a time window, e.g., since 8 hours ago, since yesterday, etc.
- Replay missing messages since the time of a particular message attempt.
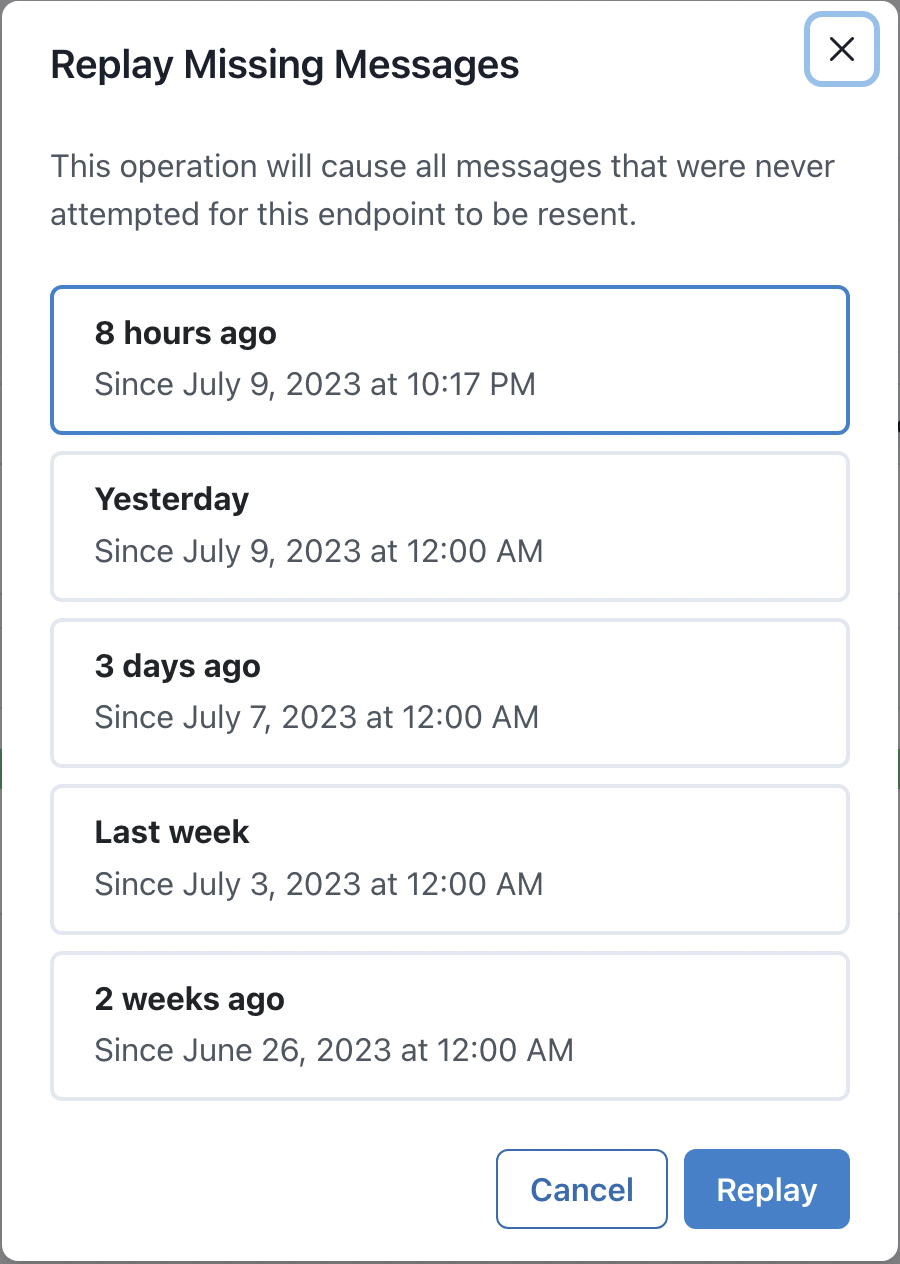
Replaying missing messages cause all messages that were never attempted for an endpoint to be resent. This may be useful when your endpoint was not subscribed to a particular event type when it should have been or if it was disabled for some time.
Testing Your Endpoints
You can quickly test your endpoint configuration through the Testing tab by sending an example event.
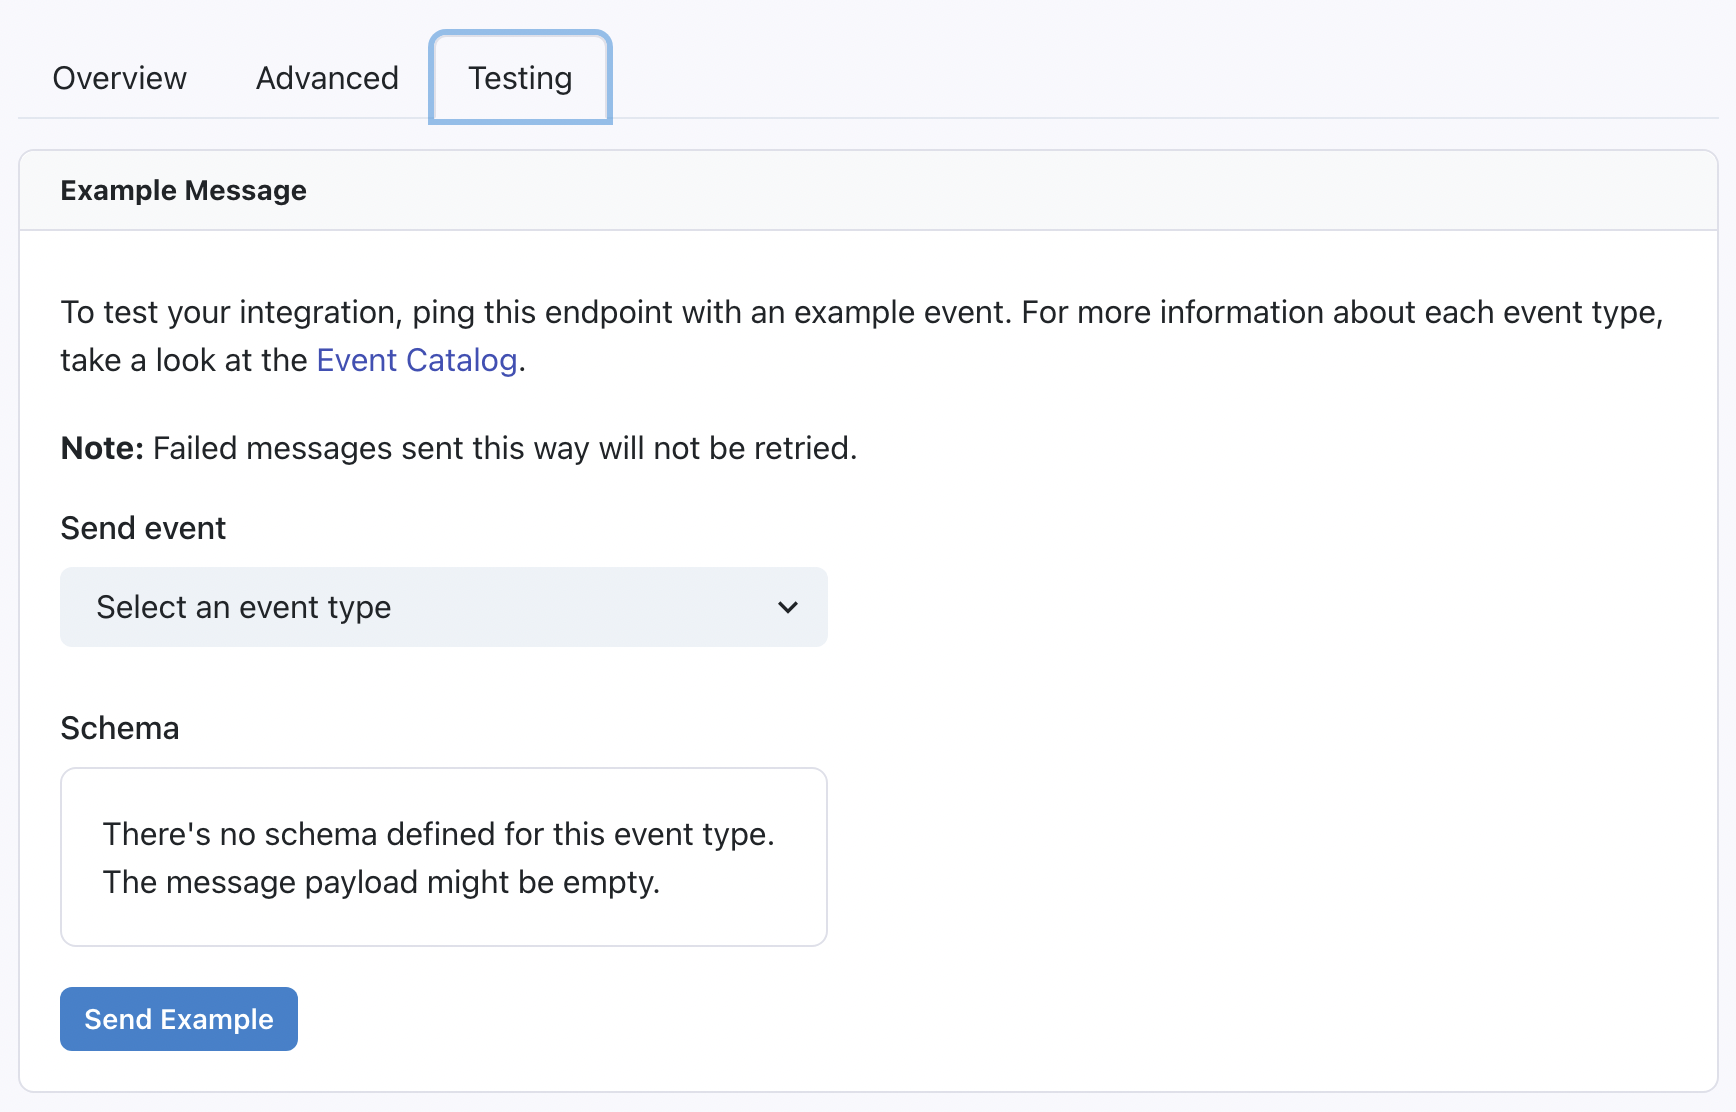
Testing an Endpoint
If the message does not show as Succeeded in the Attempted Messages section, you can go to the Message Logs by clicking the message in the Attempted Messages section and checking the response in the Webhook Attempts section to debug what went wrong.
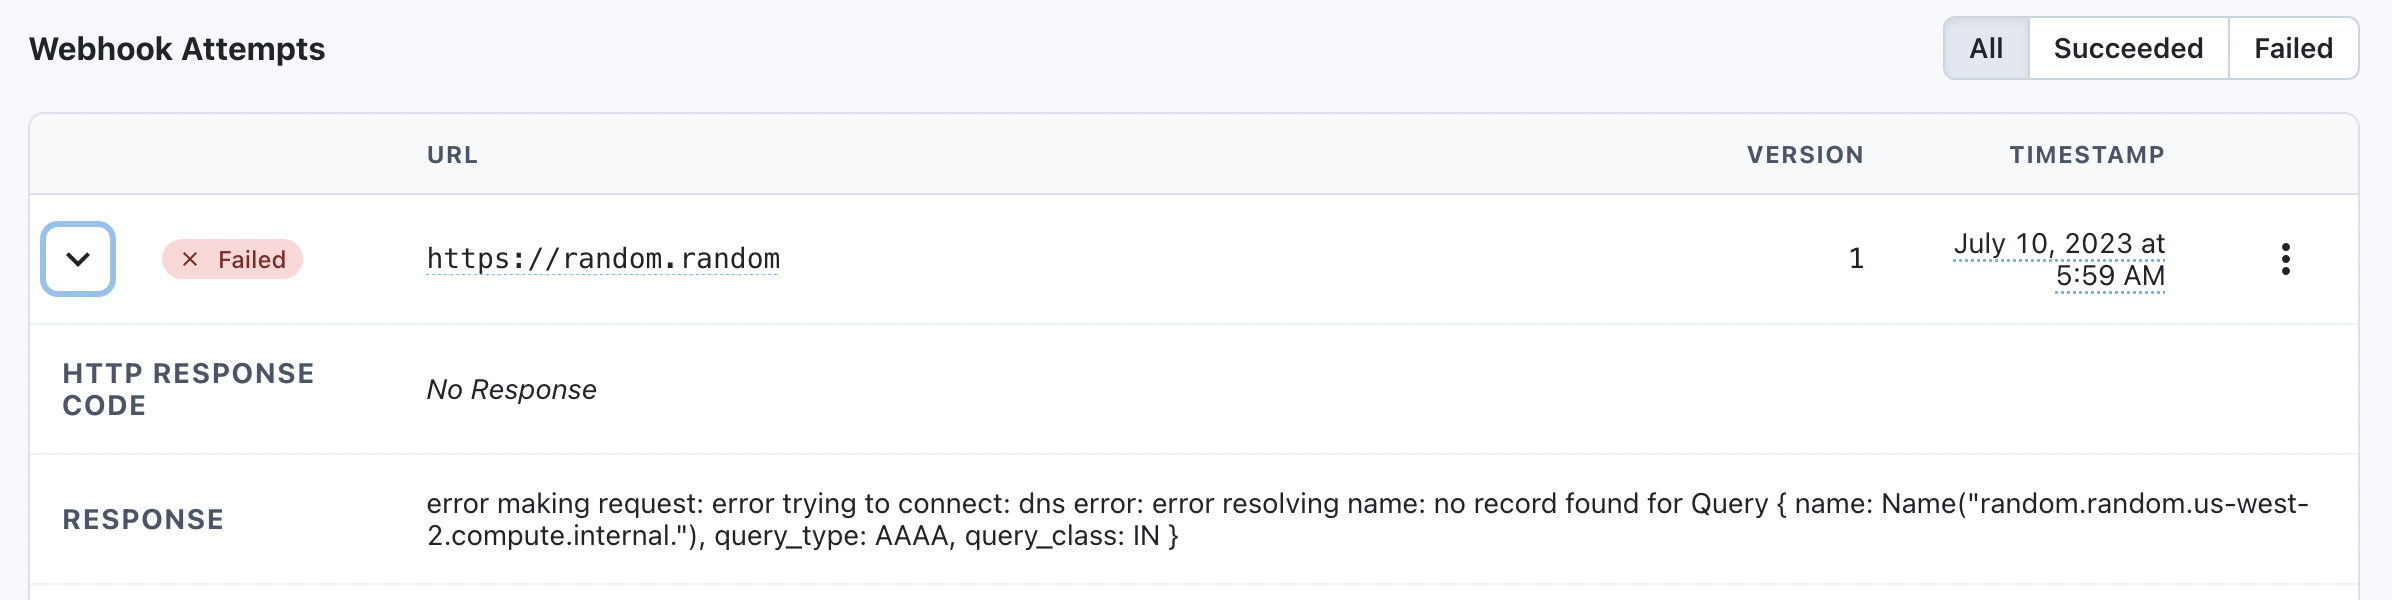
Example of a Failed Webhook Attempt's Response
Message LogsOnce you enable webhooks on Clazar, even if you do not add an endpoint, your message logs will start showing all events that Clazar sends through webhooks. This is expected behaviour. But each of your endpoint will receive only those messages the event types for which it subscribes to. That is to say that some messages in message logs may not have any webhook attempts at all depending on your endpoints' configuration.
Additional Resources
Clazar's Webhooks are powered by Svix, and for details on more topics like Verifying Webhooks, you can refer to their documentation here.
Updated about 1 month ago
Set up API access to programmatically fetch data or perform marketplace actions in response to Webhook events.