
Set up single sign-on (SSO)
Single Sign-On (SSO) enables your team members to access the Clazar system using a single set of credentials. Clazar supports SAML (Security Assertion Markup Language), an open standard for authentication.
What is SAML?SAML, based on the Extensible Markup Language (XML) format, facilitates the transfer of authentication data between the Identity Provider (IdP) and the Service Provider (SP).
In Clazar, you can configure SAML-based SSO and enforce SSO login for all users.
Good to KnowSSO setup process should be done by an IT administrator with experience creating applications in your identity provider(IdP) account.
Setup
Step 1: Create an Application in Identity Provider (IdP)
- Log in to your Identity Provider (IdP) account.
- Navigate to your applications section.
- Create a new application for Clazar.
- Obtain the required Audience URI and Sign-on URL (ACS, Recipient, or Redirect values)
Step 2: Setup SSO
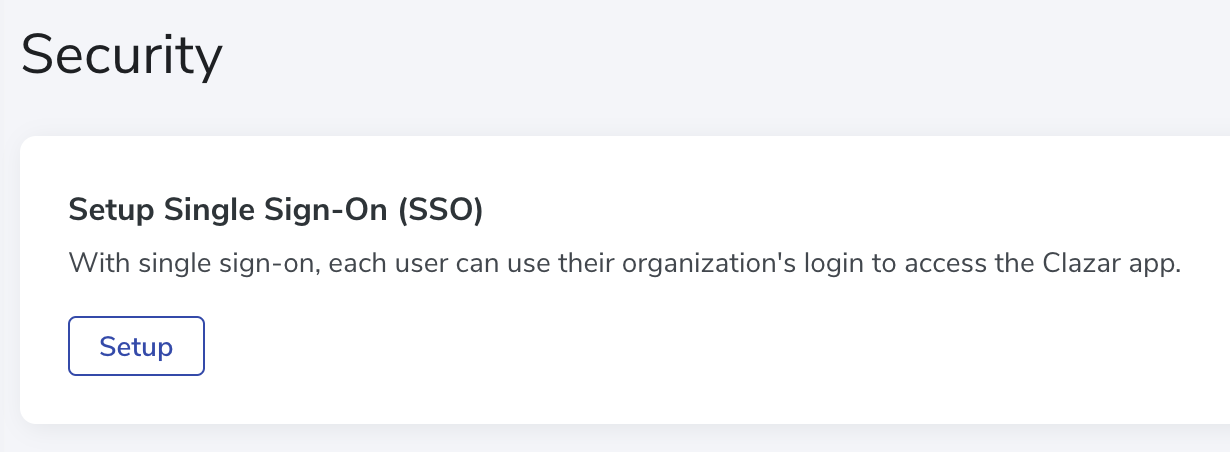
- In your Clazar account, Go to Settings > Security.
- Under Security, click Setup on the Single Sign-on Setup Card.
Step 3: Save and Verify
- Paste the copied values from your IdP into the corresponding fields below.
- Click Save and Verify
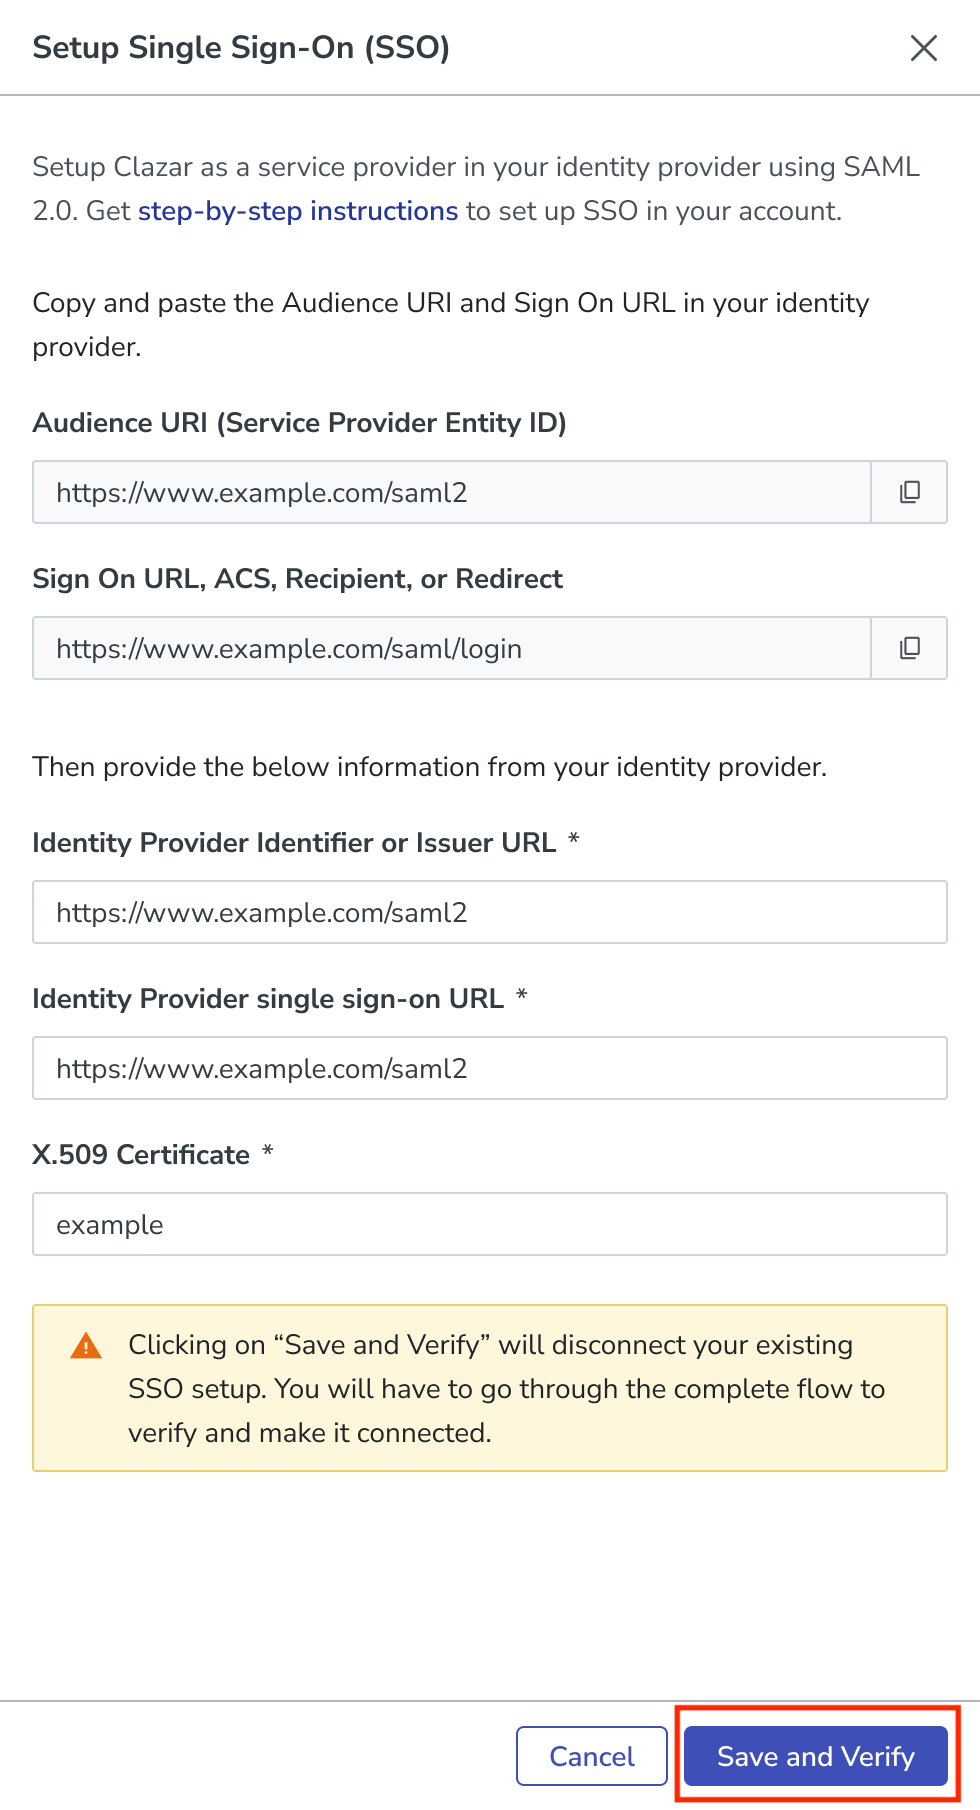
Step 4: Verify Connected
- Once your SSO credentials are successfully verified, the connection will be established.
- A Connected indicator will appear to confirm the successful connection.

Login via SSO
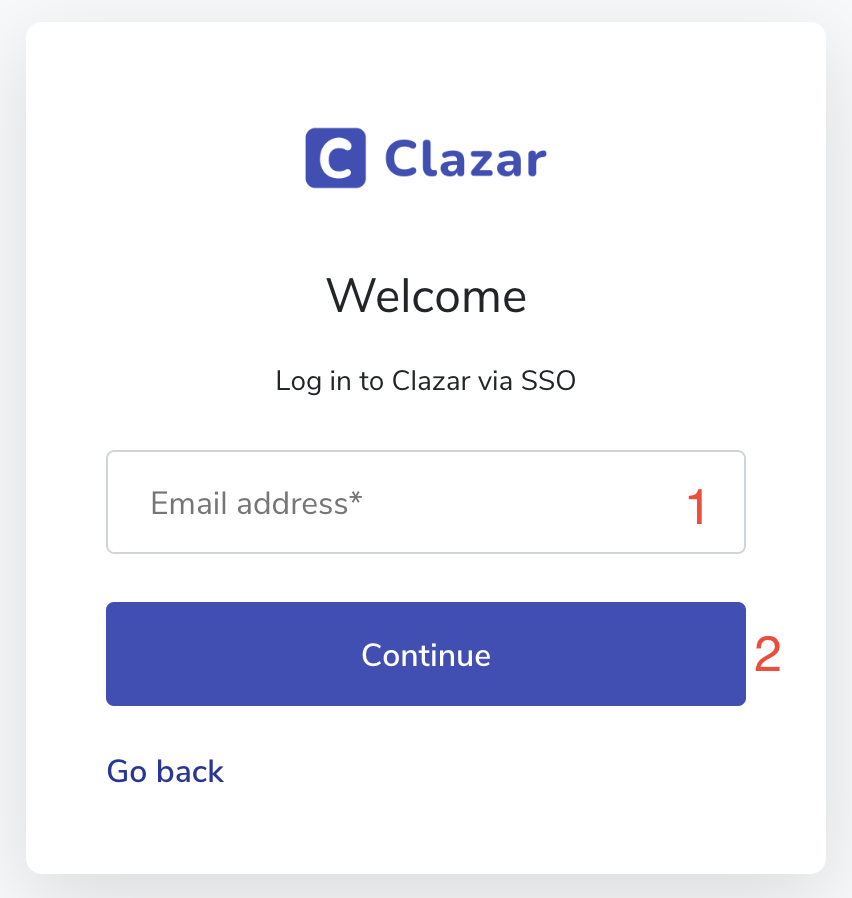
Step 1: Continue with SSO
- To begin the login process via Single Sign-On (SSO), click the Continue with SSO button on the login page.

Step 2: Enter your Email Address
- You will be asked to enter the email address associated with your Clazar account.
- This ensures that you are directed to the appropriate Identity Provider (IdP) for authentication.
Step 3: Redirect to Identity Provider (IdP) Login Page
- If SSO is configured
- After entering your email address, you will be automatically redirected to your organization’s Identity Provider (IdP) login page.
- At the IdP login page, you must authenticate using the credentials provided by your organization.
Step 4: Authentication and Redirect Back to Clazar
- If SSO is configured, users will be redirected to the Identity Provider (IdP) login page for authentication.
- Upon successful authentication, the user will be redirected back to Clazar with their session established, allowing them to access the platform securely.
Important to Note!
- Clazar only supports Service Provider (SP) initiated logins.
- IdP initiated logins are not allowed, ensuring that all authentication flows are managed directly through Clazar for enhanced security and control.
Login via SP (Service Provider) Sign-On URL
The SP Sign-On URL allows users to log in by being redirected to their Identity Provider (IdP) for authentication.
How does the SP Sign-on URL work?
Base URL: https://app.clazar.io/sso-login
The SP Sign-On URL accepts specific parameters, such as:
login_domain: The domain associated with the Clazar account.login_email: The email address of the user attempting to log in.
Steps for Authentication
- Access the SP Sign-On URL:
- The user accesses the SP Sign-On URL with one or both parameters (
login_domainorlogin_email)
- The user accesses the SP Sign-On URL with one or both parameters (
https://app.clazar.io/sso-login?login_domain=clazar.io
https://app.clazar.io/[email protected]
https://app.clazar.io/sso-login?login_domain=clazar.io&[email protected]
https://app.clazar.io/sso-login?login_domain=clazar
https://app.clazar.io/sso-login?login_domain=clazar.io&login_email=clazar.io
https://app.clazar.io/sso-login?login_domain=clazar.io&[email protected]- Redirect to IdP:
- The application redirects the user to the configured Idp for authentication.
- Authentication at IdP:
- The IdP verifies the user's credentials and redirects them back to the Clazar application with a successful authentication response.
- Validation of
login_email(if provided)- If
login_emailwas passed in the SP Sign-On URL, the application validates whether the authenticated user's email matches the providedlogin_email. - If the emails match, the user is logged in successfully.
- If the emails do not match, an error message is displayed.
- If
- Validation of
login_emailandlogin_domain(If both provided)- The login email domain should match the login domain.
Login Methods For Users
- In your Clazar account, Go to Settings > Security.
- Under Login Methods, Select allowed Login Methods for users and Admins
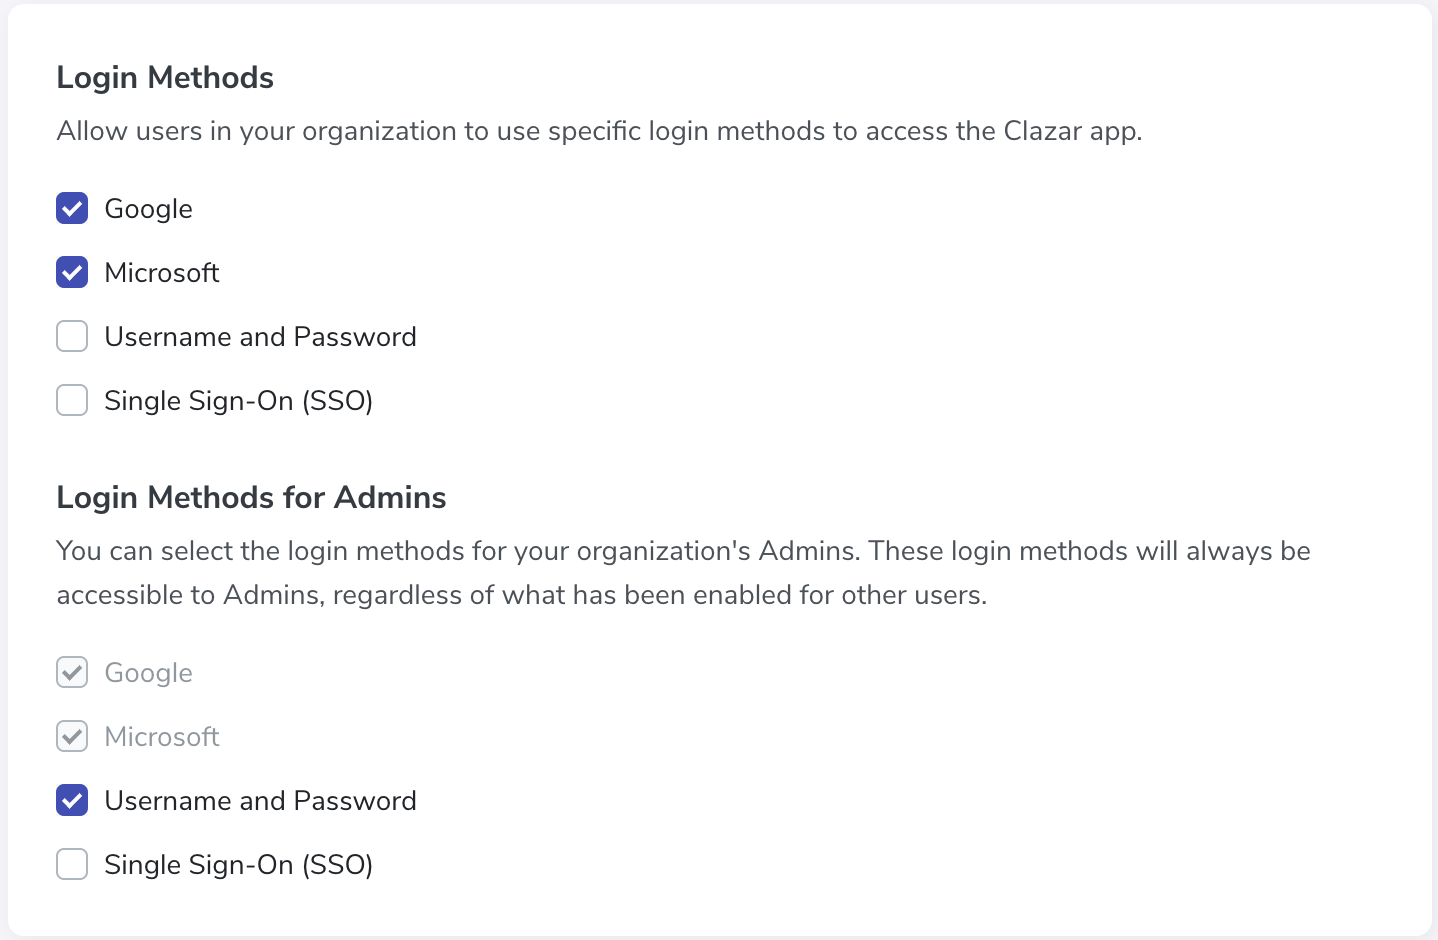
Enforce SSO for all users
After setting up SSO, you can mandate that all users log into Clazar using SSO credentials only.
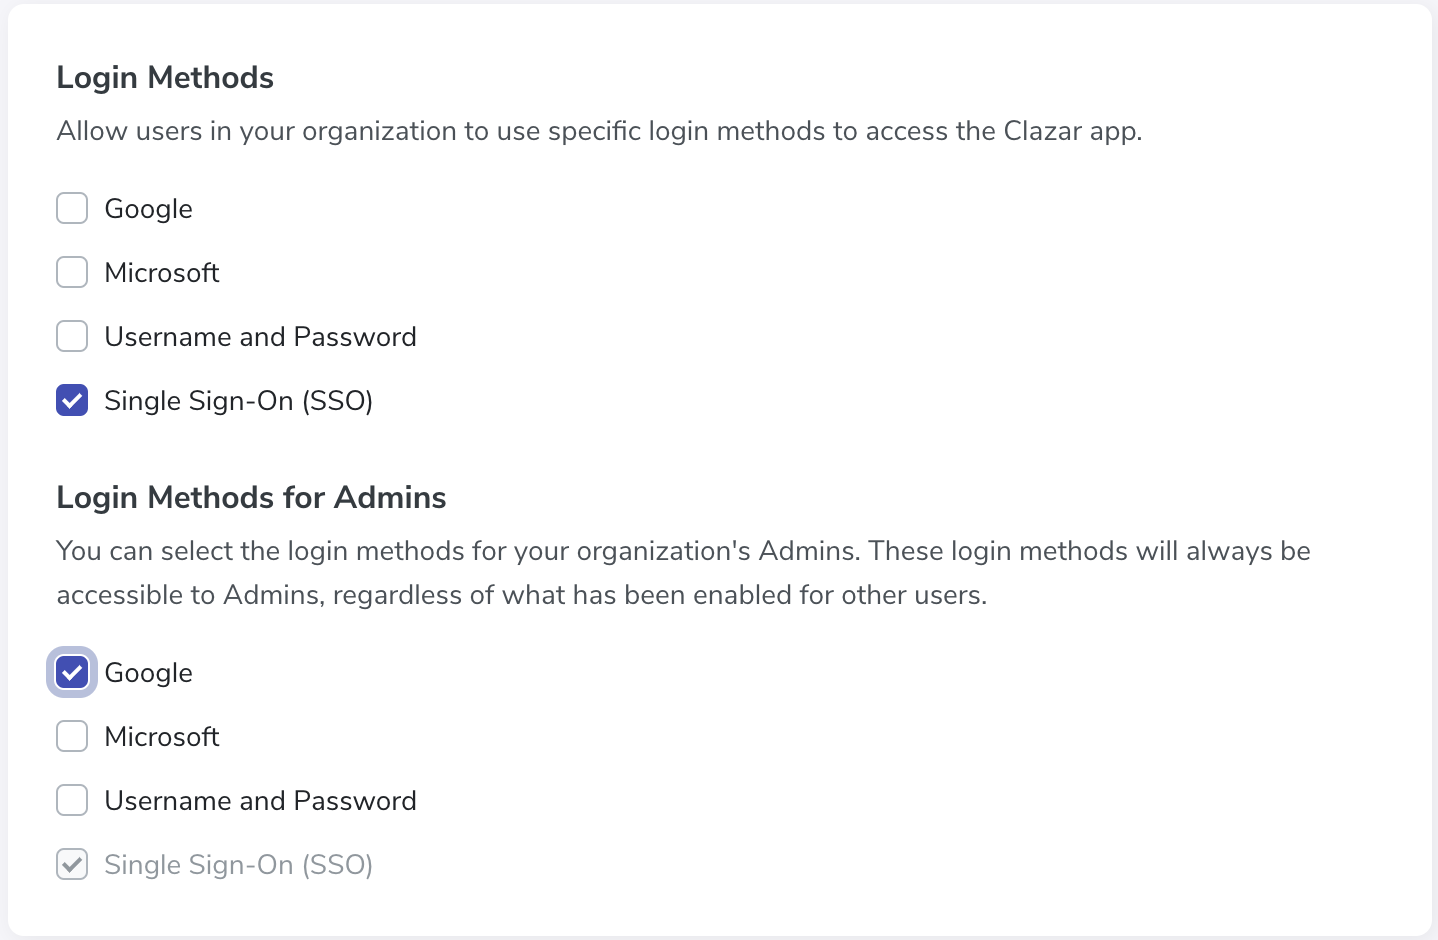
Select Single Sign-On(SSO) and unselect all other login methods to make SSO only.
Login methods for AdminsYou can select the login methods for your organzation's Admins. These login methods will always be accessible to the Admin, regardless of what has been enabled for others users.
Updated 29 days ago